Switch&Roll StrollerUpdated 19 days ago
First 10 minutes
New to the Switch&Roll? Here's all you need for your first walk.
Suspension tuning, seat reversal, folding, and storage can wait.
Safety
+−
WARNING
Never leave children unattended. Failure to follow these warnings and instructions could result in serious injury or death.
Always use the Veer Switchback Seat with the &Roll frame. Children must remain seated with all limbs inside the stroller during use. The 5-point harness must always be engaged — in both stroller and booster mode. The arm bar must remain attached at all times; it is not a restraint.
Key safety rules
- Single stroller: Max 50 lbs (22.5 kg) or 45 in (114 cm).
- Double stroller (front position): Max 40 lbs (18 kg) or 45 in (114 cm).
- Maximum storage basket weight: 30 lbs (13.5 kg).
- Never park on a hill or incline with a child in the seat.
- Always lock the brake when loading or unloading your child.
- Never use on stairs or escalators.
- Booster mode: adult chairs only. Not for use in motor vehicles.
- Booster mode requires both bottom and back straps secured.
- Do not modify with non-Veer products.
This product complies with ASTM F833 (strollers) and ASTM F2640 (booster seats) standards.
Opening the frame
+−
Your frame arrives folded. Here's how to open it.
Unfold the frame
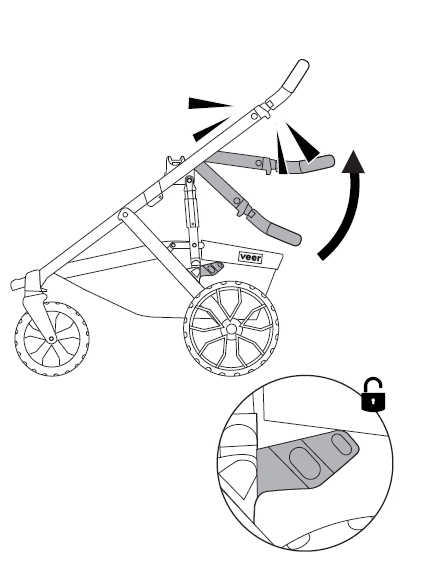
Stand the folded frame upright on the ground. Find the silver release tab on the left side, just above the rear wheel hub.
Press the tab inward and pull the handlebar straight up with your other hand. Keep pulling until you hear a firm click.
✓ Give the handle a gentle push forward. If the frame stays locked open, you're good.
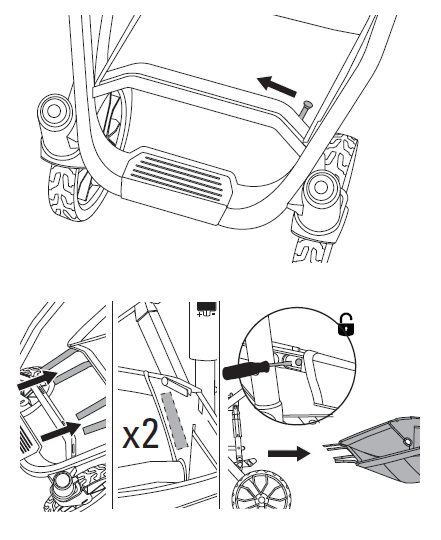
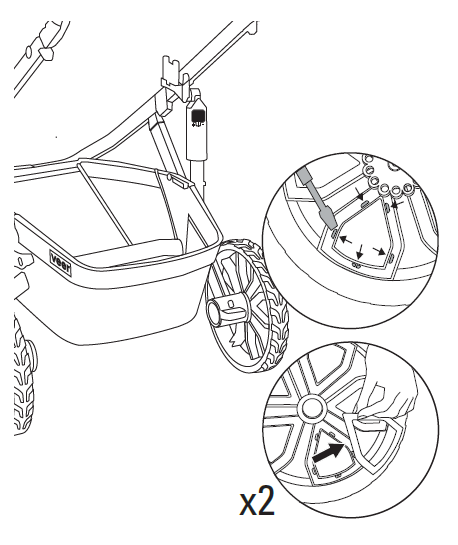
Wheel installation & removal
+−
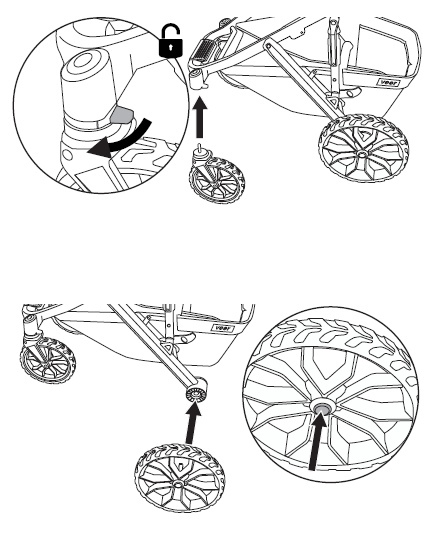
Two smaller swivel wheels go in front, two larger wheels go in back.
Install all four wheels
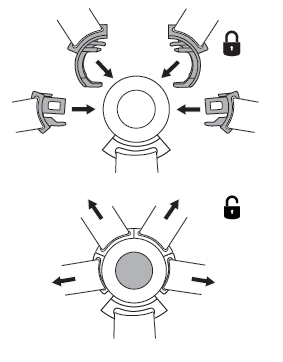
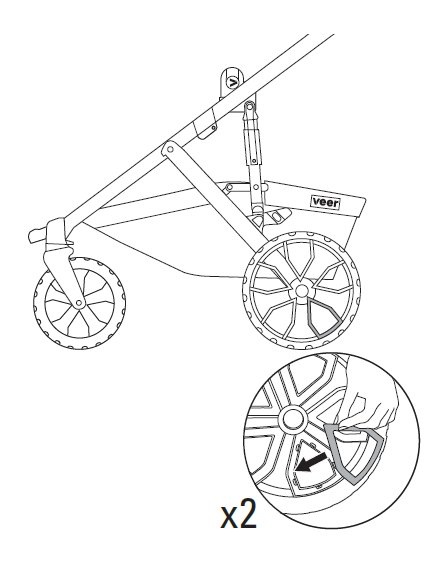
Front swivel wheels: Hold a wheel by its fork and slide the metal post straight up into the front wheel socket. Push until it clicks. Tug downward to confirm it's locked. To remove: press the small button on the socket and pull down.
Rear wheels: Press the small silver button on the center of the rear axle hub, then slide the wheel post in until it clicks. Release the button. Pull outward to verify it's locked. Press button again to remove.
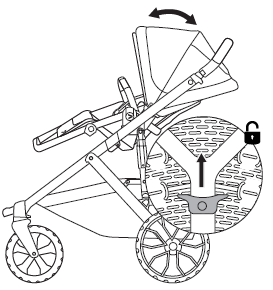
Brakes & swivel locks
+−

Set the parking brake
Parking brake: Find the wide pedal between the rear wheels. Step down on the red side to lock. Step on the green side to release.
Always lock the brake before placing your child in or taking them out of the seat.
Front swivel lock (optional): For rough terrain (grass, gravel, trails), flip the small lever on top of each front wheel fork to the locked position. This stops the wheels from swiveling and improves stability. Flip back to unlocked for normal sidewalk use — you'll get a tighter turning radius.
Handle height adjustment
+−
Set handle height for your comfort
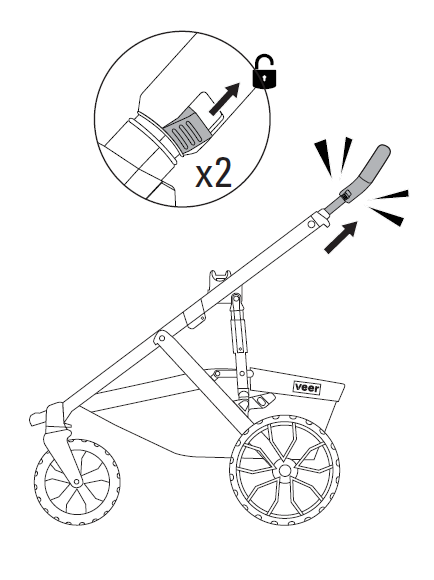
Squeeze the two oval buttons on either side of the handlebar (one per hand) and slide the handle up or down. Release to lock into position.
Which position? Positions 1–2 (lowest) for parents under 5'6". Position 3 for 5'6"–5'10". Positions 4–5 (tallest) for parents over 5'10".
Your wrists should be relaxed, not bent upward. If they are, go one position higher.
Suspension tuning
+−
Adjust suspension firmness
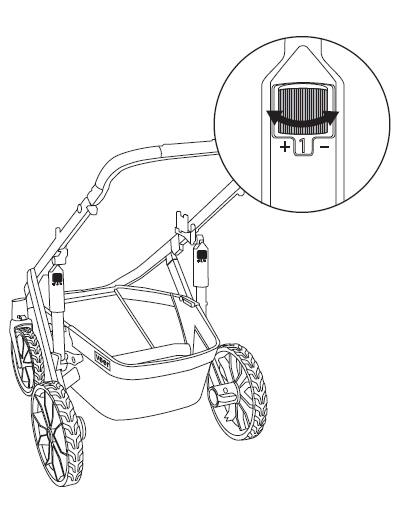
Locate the shock knob near each rear wheel. Rotate to set firmness: 1 = softest, 6 = firmest. Set both sides to the same position.
| Child weight | Smooth | Mixed | Trail |
|---|---|---|---|
| Under 15 lbs | 1 | 2 | 3 |
| 15–25 lbs | 2 | 3 | 4 |
| 25–35 lbs | 3 | 4 | 5 |
| 35–50 lbs | 4 | 5 | 6 |
Softer = smoother ride for your child. Firmer = more control on rough ground. When in doubt, start soft and go up.
Storage basket
+−
Access and remove the basket
Front pocket: Zip or unzip for quick-access storage.
Basket: Accessible from the sides and back. To fully remove (for washing or bulky items): release front and side Velcro fasteners, unsnap sides, and push side tabs with a small screwdriver.
Maximum basket weight: 30 lbs (13.5 kg). Overloading affects stroller stability.
Weight & height limits
Suitable from birth (with optional infant accessory) through the limits above, whichever is reached first.
Installing the Switchback seat
+−
Install pads and canopy first, then attach the seat to the frame.
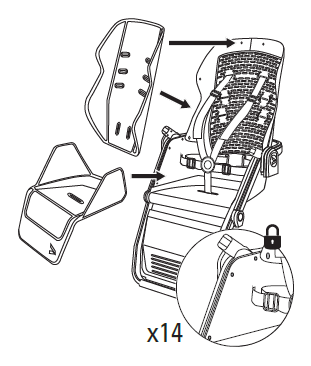
Install seat pads
Lay the seat pad (bottom cushion) onto the seat base. Align the snaps and press firmly. Drape the back pad over the seat back and secure using snaps and elastic loops on each side.
Make sure the harness straps pass through the pad openings — not underneath the pads.
✓ Tug each pad gently. They should sit snug with no loose flapping.
Attach canopy
Line up the canopy arms with the canopy sockets on either side of the seat back (near the top). Push each arm in until it clicks.
The canopy attaches to the seat, not the frame — so it stays on even when you reverse the seat direction. Pull forward to extend, push back to retract.
✓ Both arms should feel solid with no wobble.
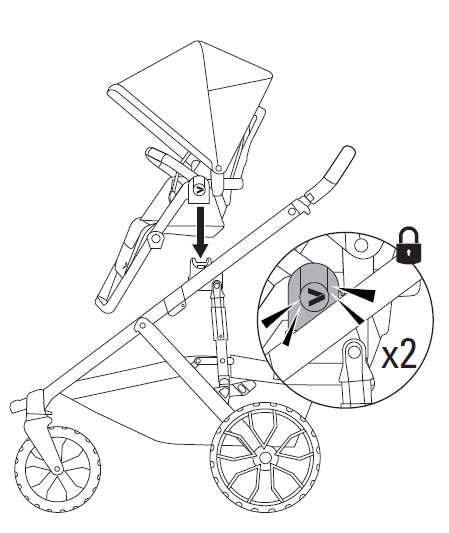
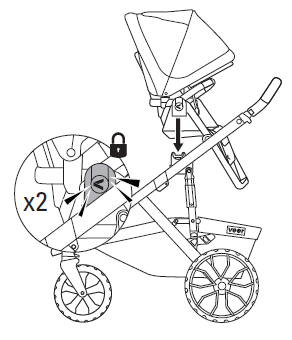
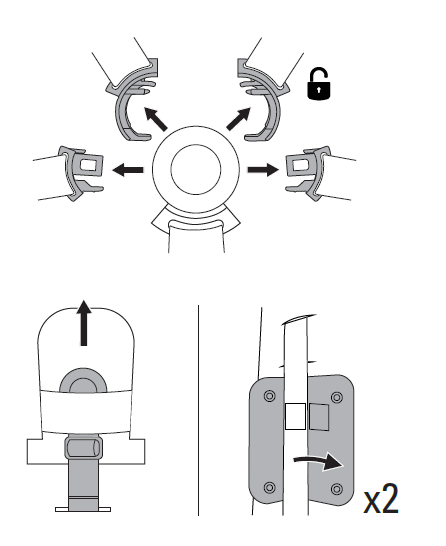
Attach seat to frame
Choose direction first. Seat label toward handlebar = child faces you (parent-facing). Label away from handlebar = child faces forward (world-facing).
Hold the seat by both sides. Line up the two round hubs on the bottom with the frame's hub receivers. Lower the seat straight down — don't angle it. Press firmly until both sides click.
✓ Grip the arm bar and pull upward firmly. If the seat doesn't lift off, it's locked.
To remove: Press the silver hub buttons (one on each side) and lift straight up.
Adjusting the recline
+−
Set the seat recline angle
Squeeze the trigger on the back of the seat with one hand. Guide the seat back to your desired angle with the other hand. Release the trigger to lock. Four positions available.
Most upright: Best for alert, older toddlers who want to look around.
Near-flat: Best for napping or younger babies.
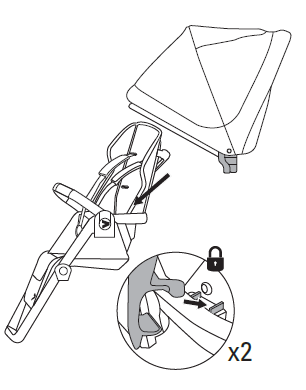
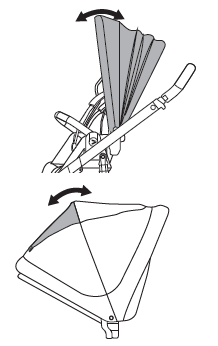
Reversing seat direction
+−
Remove or reverse the seat
1. Press both silver hub release buttons (one on each side) and lift the seat straight up.
2. Rotate the seat 180 degrees so it faces the opposite direction.
3. Lower back onto the hubs and press down until both sides click.
✓ Pull up on the arm bar to confirm it's locked.
The canopy stays attached when you flip — no need to remove and reattach it.
Harness setup
+−
The 5-point harness must always be used — in both stroller and booster mode.
Buckle the harness
With your child seated, pull the two shoulder straps over their shoulders. Pull the two hip straps out from either side of the seat base.
Click the shoulder straps into the center buckle first, then the hip straps. A click for each connection.
To release: Press the center button — all straps release at once.
The arm bar is not a restraint on its own. Always use the full 5-point harness, even for quick stops.
Adjust shoulder harness height
The shoulder straps thread through slot pairs in the seat back. Multiple heights are available.
To change slots: From behind the seat, pinch the metal strap anchor and pull it through the current slot. Re-thread it through the new slot from back to front.
Newborns / small infants: Use the lowest slot pair.
Older toddlers: Use the highest slot pair.
Straps should emerge at or just below your child's shoulder level — never above.
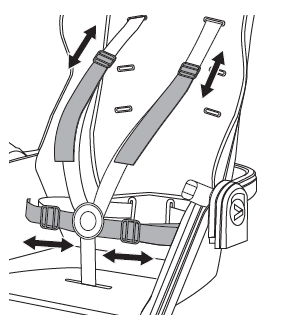
Tighten and fit the harness
Pull the adjustment strap (front of buckle, between child's legs) downward to tighten.
Fit check: Two fingers between the chest strap and your child's chest. Snug enough you can't fit a third.
To loosen: lift the buckle tab and pull the shoulder straps outward.
Calf support
+−
Adjust calf support position
Press the adjustment buttons on each side and slide the calf support forward or back. Release to lock.
Your child's legs should rest comfortably without their knees being pushed up.
Use the canopy and peek-a-boo window
Pull the canopy forward for more sun and wind coverage. Push back to retract.
The peek-a-boo window on the back panel opens with a magnetic flap — flip it open to check on your child when the seat is parent-facing.
Color kit installation
+−
The Switchback Color Kit lets you swap the canopy, seat pads, shoulder pads, and wheel inserts for a fresh look. Sold separately.

Remove the existing canopy
Push the rear canopy tabs upward, then pull the side connectors upward to detach the canopy from the support bar.
Remove harness and shoulder pads
Open the arm bar and unbuckle the harness. Remove the harness buckle cover. Unfasten and remove the shoulder pads.
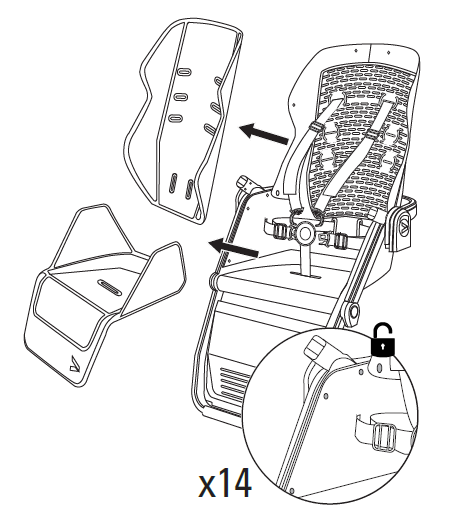
Remove seat and back cushions
Detach the seat and back cushion connectors, then pull the harness straps through the slots.
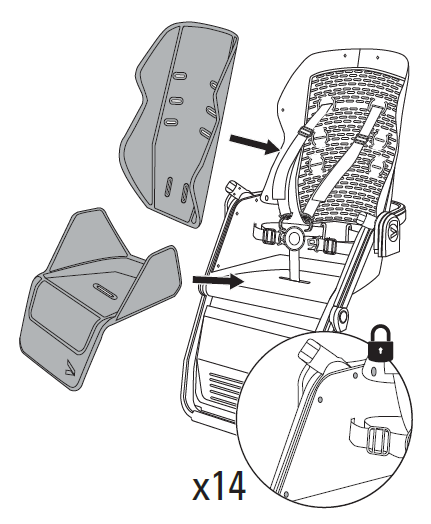
Install new seat and back cushions
Seat cushion: Pull the crotch strap through the seat cushion slot, then secure all eight connectors.
Back cushion: Pull the chest and shoulder straps through the slots, then secure all six connectors.
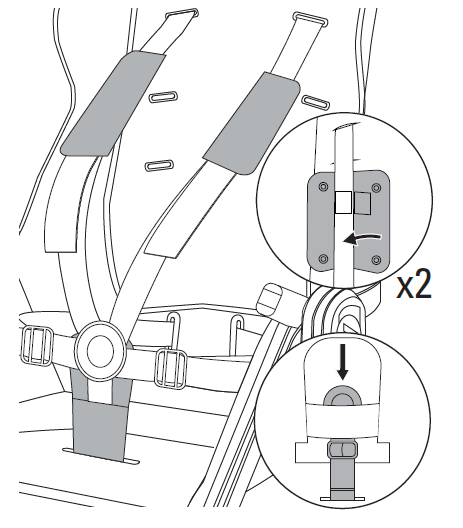
Install new harness and shoulder pads
Slide the harness buckle cover into place. Attach the new shoulder pads and secure each with a snap button.
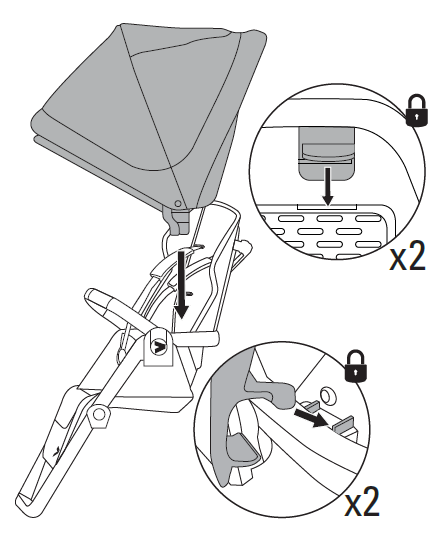
Install new canopy
Engage the canopy connector on each side of the support bar. Align the tabs, then insert them into the seat back until they click.
Remove existing wheel inserts
From the rear of each wheel, use a flathead screwdriver to carefully extract the existing wheel insert.
Install new wheel inserts
Gently press each new wheel insert into the wheel hub until it is fully seated and secured in place.
✓ All new color kit pieces should be snug with no loose connections. Give the canopy, cushions, and shoulder pads a gentle tug to confirm.
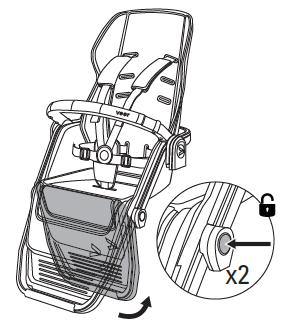
Folding (without seat)
+−
Fold for storage (without seat)
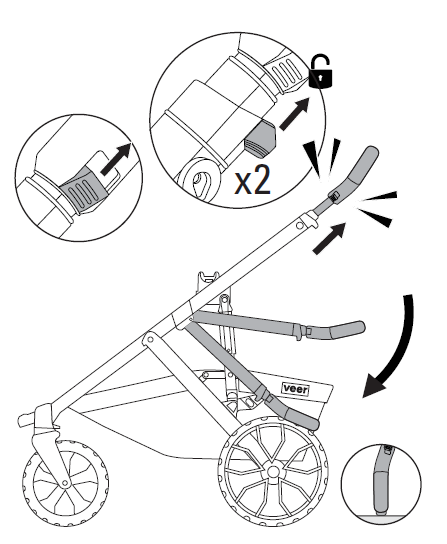
1. Extend the handlebar to its tallest position — this gives you leverage.
2. Find the two fold actuators — the levers on either side of the handle, right where it meets the frame.
3. Pull both actuators toward you simultaneously and push the handlebar forward and down in one smooth motion.
4. The frame swings down and clicks into the folded position. It stands upright on its own when folded.
The first few folds feel stiff — this is normal and loosens up quickly with use.
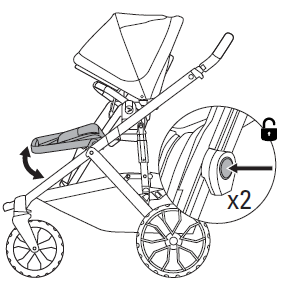
Folding (with seat attached)
+−
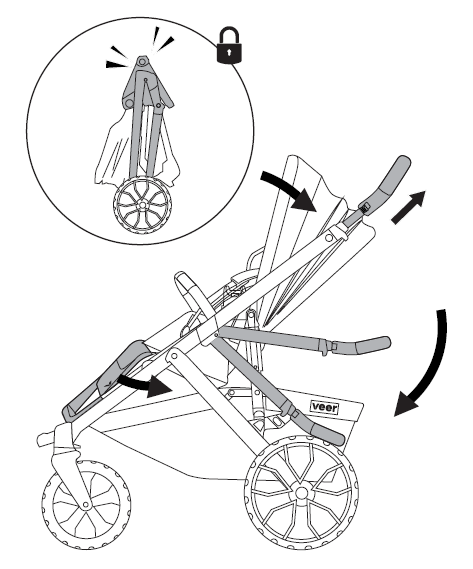
Fold for storage (with seat)
1. Push the seat back to the most upright recline position.
2. Fold the calf support flat against the seat base.
3. Now follow the same fold sequence: extend handle to tallest, pull both actuators, push forward and down.
The seat tucks into the frame as it folds. Listen for the click confirming the fold is locked.
Booster seat mode
+−
Important
The Switchback converts to a feeding/activity booster seat. This is a completely separate use from stroller mode.
Not for use in motor vehicles. Booster mode is for use on adult chairs only.
The adult chair must have a minimum seat depth of 15 in, seat width of 17 in, and backrest height of 17 in.

Prepare the seat
Remove the Switchback Seat from the stroller frame (if attached). Remove the canopy. Set the recline to the most upright position.
Fold calf support
Press the adjustment buttons and fold the calf support completely flat against the seat base. This creates a stable surface for the chair.

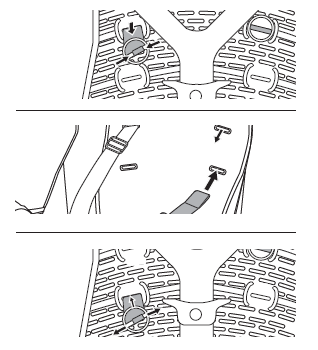
Secure bottom strap
Place the seat on the adult chair. Route the bottom attachment strap around the seat of the chair (under the cushion if possible) and buckle tight. This prevents the booster from sliding forward.

Secure back strap
Route the back attachment strap around the backrest of the chair and buckle. Pull tight — the seat should not tip or shift when your child leans.
✓ Push the booster forward and sideways. It should feel firmly attached with no movement.
Always use both straps (bottom and back). Always use the 5-point harness in booster mode too.
Leather grip care
+−
Your Switch&Roll features premium leather grips on both the stroller frame handlebar and the Switchback Seat arm bar. With proper care, the leather will develop a rich patina and last the lifetime of your stroller.
Daily use
The leather grips are designed to be used as-is. Natural oils from your hands will condition the leather over time. This is normal and desirable — it's how leather develops character.
Routine cleaning
Wipe the grips with a clean, dry or slightly damp cloth after use. If the grips get dirty (sunscreen, food, etc.), use a damp cloth with a tiny amount of mild soap. Wipe off the soap residue with a clean damp cloth and let air dry completely.
Conditioning (every 2–3 months)
Apply a small amount of leather conditioner or leather balm to a soft cloth and work it into the grips. Let it absorb for 10–15 minutes, then buff off any excess with a clean dry cloth. This prevents drying and cracking, especially in hot or dry climates.
What to avoid
- Water: Do not soak the grips or leave them wet. If they get wet (rain, spills), wipe dry immediately and let them air dry out of direct sunlight.
- Direct sunlight: Prolonged UV exposure will dry out and fade the leather. Store your stroller out of direct sunlight.
- Harsh chemicals: Do not use alcohol-based cleaners, bleach, abrasives, or all-purpose household cleaners on the leather.
- Power washers: Never use a power washer on any part of the stroller, including the leather grips.
Light scratches & scuffs
Minor surface scratches are normal and add character. Most light scratches can be buffed out by rubbing gently with your finger or a soft cloth — the warmth and natural oils help blend the scratch into the surrounding leather. For deeper scuffs, apply a small amount of leather conditioner and buff.
Seasonal storage
Before storing the stroller for an extended period, clean and condition the leather grips. Store in a cool, dry place away from direct sunlight and heat sources. Avoid storing in plastic bags or airtight containers — leather needs to breathe.
Cleaning & maintenance
+−
Frame, wheels & non-leather grips
Store your Switch&Roll out of direct sunlight and environmental elements. Wipe with a damp cloth and mild detergent, then dry thoroughly. Do not use abrasives. Never use a power washer.
After salt water or sand
Salt water: Rinse the frame (avoiding leather grips) with fresh tap water as soon as possible to prevent corrosion. Wipe leather grips dry with a clean cloth.
Sand: Use a soft brush to gently brush sand away, then cycle all moving parts until the sand is ejected and components move freely.
Washable components
Stroller basket: Wipe with a damp cloth and mild detergent. Alternatively, the basket is hose-washable. May also be removed for hand washing in cold water. Dry flat and away from direct sunlight. Do not bleach, iron, or dry clean.
Seat pads: Unsnap the seat pad and back pad. Machine wash on gentle cycle, cold water. Air dry flat, away from direct sunlight. Do not bleach, iron, or dry clean.
Seat frame & harness: Wipe with a damp cloth and mild detergent. Do not submerge the buckle mechanism.
Canopy: Spot clean with a damp cloth. Do not machine wash. Air dry only.
Time for a check-up
The Switch&Roll requires routine user maintenance. Regularly check all connecting hardware (rivets, screws, etc.) for tightness and security. Inspect brakes, wheels, and tires and replace or repair as necessary. Check all safety devices, locks, and harnesses for correct and secure operation. Inspect leather grips for cracking or excessive wear and condition as needed.
Only Veer replacement parts should be used. It may be unsafe to use parts supplied by another manufacturer. Contact customer service with any questions at [email protected].
Limited warranty
+−
We've got you covered. The Switch&Roll stroller (including &Roll frame, Switchback Seat, and leather grips) is guaranteed to be free from any manufacturing defects for a period of 2 years from the date of purchase under normal use and in compliance with the operating instructions.
This warranty is not transferable and extends only to the original retail purchaser with proof of purchase. Valid only in the original country of purchase. Veer will provide replacement parts or conduct repairs if deemed appropriate.
Need help? Phone: 470-344-3200 · Email: [email protected]
For full warranty details, visit goveer.com
Revision history
- v1Jun 8, 2026Changed the safety warnings section title to "WARNING."