Sidewall KitUpdated 3 months ago
First 5 minutes
Swapping your Cruiser sidewall panels? Here's the fastest path from old panel to new.
Cleaning, safety, and warranty details can be found below.
Safety warnings
+−
Never leave children unattended.
Failure to follow these warnings and instructions could result in serious injury or death.
General safety
- Ensure that all the locking devices are engaged before use.
- To avoid injury, ensure that your child is kept away when unfolding and folding this product.
- Do not let your child play with this product.
- Always use the restraint system.
- Check that the pram body or seat unit or car seat attachment devices are correctly engaged before use.
- This product is not suitable for running or skating.
Sidewall panels
- Never use the Cruiser without the sidewall panels installed.
- Always verify the sidewall panels are securely attached in the Cruiser per the instructions.
What's in the box
+−
- Sidewall panels (left and right)
- Color wheel inserts
One kit covers both sides of your Cruiser and includes the matching wheel color inserts — you don't need to order two.
No tools are required for installation.
Installing the sidewall panels
+−
Follow all ten steps in order to remove your existing sidewall panels and install the new ones. Always verify the panels are securely attached before using the Cruiser.
When to replace your sidewalls
Sidewall panels naturally fade and soften in color with prolonged sun exposure over time. This is normal wear — not a defect — and installing a fresh kit restores the original look. The kit is also the way to switch to a new color.
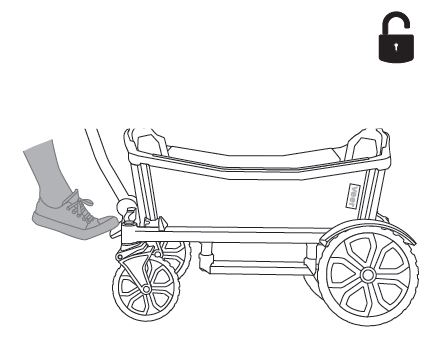
Lock the brake
Engage the brake so the Cruiser stays still throughout the swap.
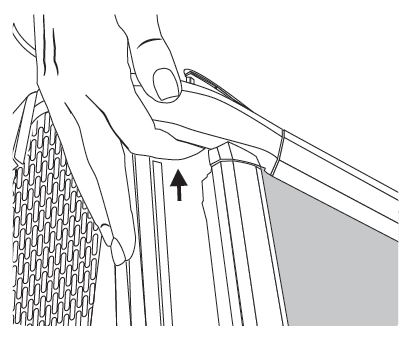
Remove plugs
Pull out the plugs at each end of the sidewall frame and set them aside — you'll reinstall them later.
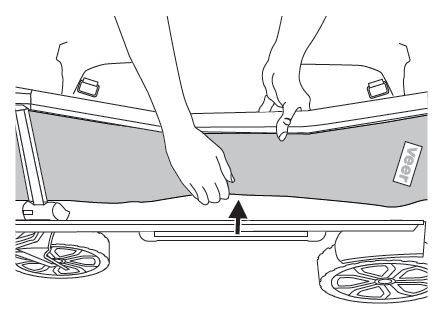
Fold down the seat back and unsnap sidewall from frame
Fold the seat back forward, then unsnap the sidewall where it attaches to the frame.
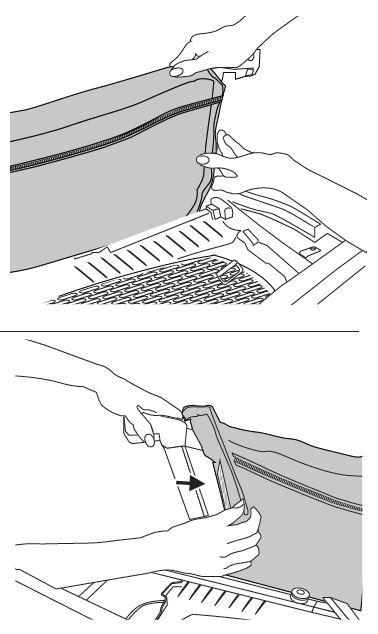
Stretch and release clips from each end of sidewall frame
Gently stretch the sidewall and release the clips at each end of the frame.
The clips fit snugly by design so the panel stays secure. Stretch the sidewall firmly and steadily — it's meant to feel tight.
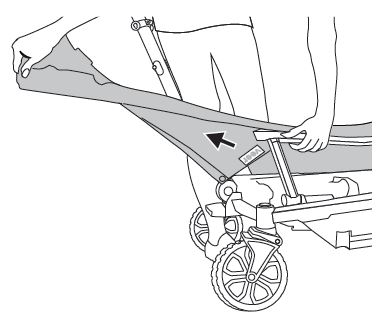
Slide out
Slide the old sidewall panel out of the frame.
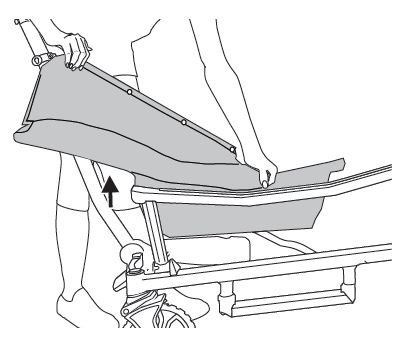
Slide new sidewall in
Slide the new sidewall panel into the frame.
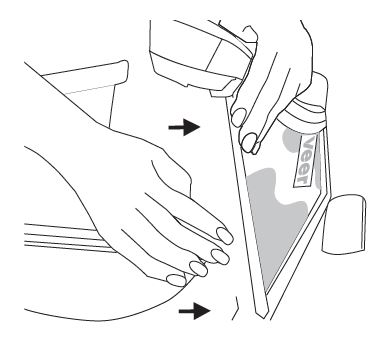
Stretch and clip sidewall ends to frame
Stretch the new sidewall and clip both ends back onto the frame.
Easiest method: seat one end onto the frame first, then stretch the panel to clip the second end in place.
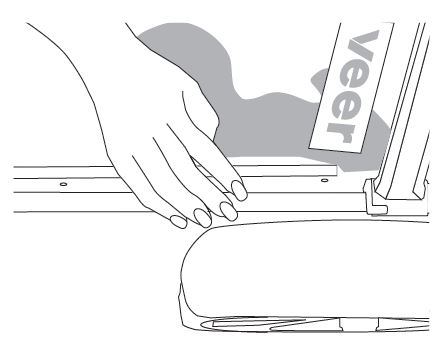
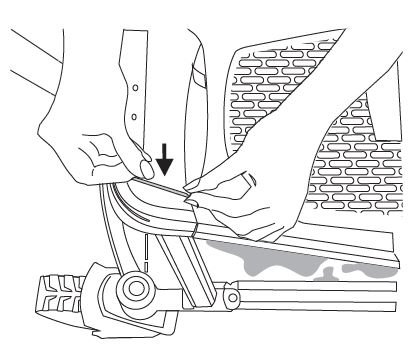
Snap sidewall to frame
Snap the sidewall back onto the frame at the attachment points.
✓ Confirm the sidewall is securely attached at every point before use.
Replace plugs
Reinsert the plugs you removed in step 2 at each end of the sidewall frame.
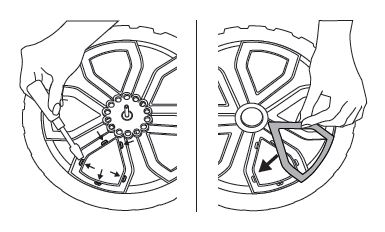
Replace wheel insert with new color insert
Swap the existing wheel insert for the new color insert to complete the look.
The inserts are a cosmetic color accent. Every color fits the same wheels, so you can swap them anytime to match your sidewalls or change your style.
Cleaning & general maintenance
+−
How to clean
Rinse the area to be cleaned thoroughly with clean water and, using a mild detergent, sponge the area gently.
Do not tumble dry, bleach, iron, or dry clean. Allow to completely air dry.
Limited warranty
+−
We've got you covered
This accessory is guaranteed to be free from any manufacturing defects for a period of 1 year from the date of purchase under normal use and in compliance with the operating instructions.
This warranty is not transferable and extends only to the original retail purchaser, and is only valid when supplied with proof of purchase.
Please retain proof of purchase for this limited warranty.
Coverage details
The warranty is valid only in the original country of purchase and is subject to the conditions set out by that country. Conditions may vary. Veer will not ship replacement or repair parts out of the country of purchase.
Veer will provide replacement parts or conduct repairs if deemed appropriate by the company. Veer reserves the right to exchange an item for a replacement part. Some parts may be replaced with newer model parts as the Cruiser is improved over time.
What's not covered
A repair issue will not be covered by this warranty if:
- The issue is caused by misuse or improper / poor maintenance. Please refer to this instruction booklet for guidance on use and maintenance.
- Damage is caused by improper installation of Veer parts and/or accessories. Please refer to this instruction booklet for guidance on Cruiser assembly and use.
- Damage is corrosion, mold, or rust caused by a lack of maintenance or service.
- Damage is due to general wear and tear from everyday use or negligence.
- Damage is caused by sun intensity, sweat, detergents, damp storage, or frequent washing.
- Repairs or modifications are carried out by a third party.
- The Cruiser is purchased from an unauthorized retailer. Approved retailers are listed at goveer.com.
- The Cruiser is second-hand.
- The Cruiser is damaged as a result of an accident, airline, or freight damage.
Veer reserves the right to determine whether the terms and conditions of the warranty have been met. For full warranty details, visit goveer.com.
Need help? Email [email protected].