Misting FanUpdated 3 months ago
First 5 minutes
New to the Misting Fan? Here's the fastest path from box to cool mist.
Cleaning, maintenance and warranty details are all covered in the sections below.
Safety warnings
+−
Please read all instructions carefully before operation
Failure to follow these warnings and instructions could result in damage to the unit.
Water & misting
- Only use spring and/or mineral water in the reservoir.
- Do not add any additives to the water.
- Never operate the mister without water in the tank.
Cleaning
- Perform regular maintenance on the mister.
- Never use detergent to clean the ultrasonic atomizer.
- Never clean the ultrasonic atomizer by scraping with a hard object.
General use
- Do not allow children to use this unit without supervision.
What's in the box
+−
Included in the box
- Misting Fan
- Micro USB charge cable
- 5 replacement wicks
Using your Misting Fan
+−
Follow these steps to set up and operate your Misting Fan.
Ultrasonic technology
The integrated misting fan/humidifier uses ultrasonic high-frequency technology to convert water into 1–5 million micro-sized particles dispensed into the air, producing a visible, micro-fine cool mist.
Specifications
- Water reservoir: 250 mL (8.5 oz.), easy to remove and fill
- Runtime: Up to 10 hours (low fan, low mist) on a rechargeable battery
- Fan angle: Adjustable
- Mist output settings: 2
- Auto shut-off: When lid is closed
- Anti-microbial technology: Protects against mold and mildew
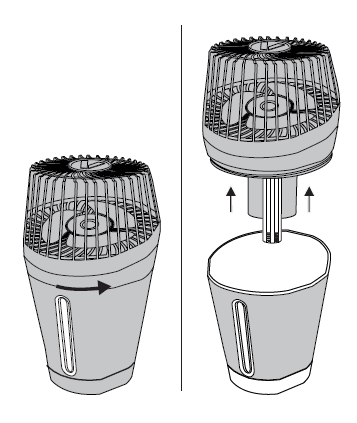
Open the water reservoir
Rotate the lid counter-clockwise and lift to access the water reservoir.
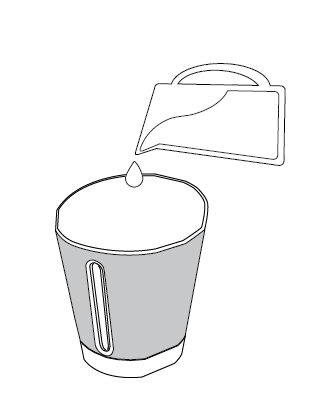
Fill the reservoir
Fill the reservoir with spring or mineral water to prevent scale buildup and dispersal of minerals into the air.
Only use spring and/or mineral water. Do not add any additives to the water.
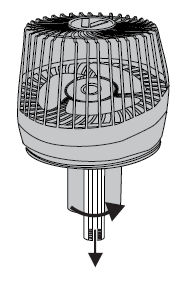
Remove the wick holder
On first-time use, turn the wick holder counter-clockwise and remove from the lid.
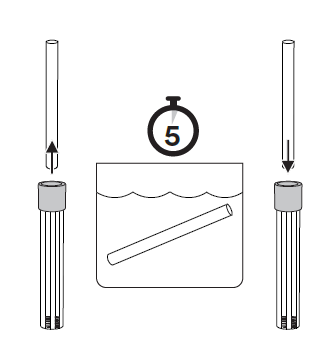
Soak the wick
Remove the wick from the wick holder and soak in a separate container of spring or mineral water for 5 minutes, then replace in the wick holder.
Do this for the pre-installed wick on first use, and each time you replace a wick.
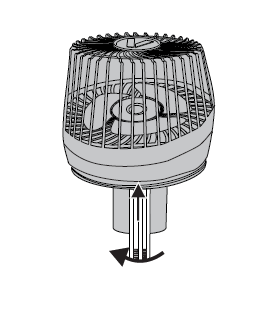
Reinsert the wick holder
Turn the wick holder clockwise and insert into the top of the lid.
✓ Wick holder should seat firmly and not spin freely.
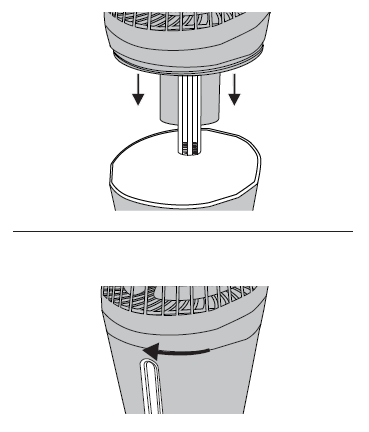
Lock the lid
Place the lid on the reservoir and rotate clockwise to lock in place.
✓ Lid should be snug and flush with the reservoir.
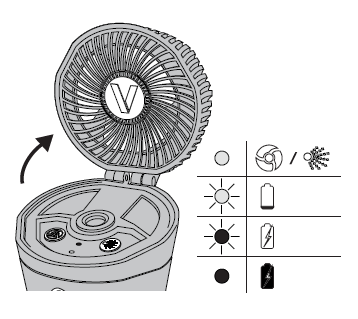
Turn on the fan
Open the top cover to operate the fan.
LED indicators
- Constant green — mister and/or fan is on
- Flashing green — low battery
- Flashing red — charging
- Constant red — fully charged
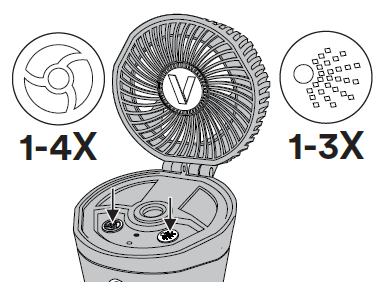
Control fan speed & mist
Press the fan speed button 1–4 times to select Off, Low, Medium or High fan speed.
Press the mist button to control mist intensity:
- 1 press — On
- 2 presses — Pulse (Low)
- 3 presses — Off
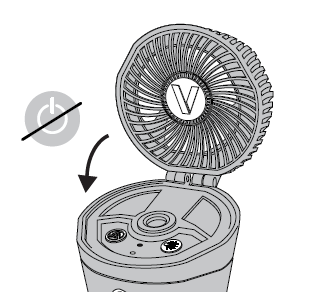
Turn off the fan
Close the top cover to turn the Misting Fan off. Empty the reservoir and dry the wick after use.
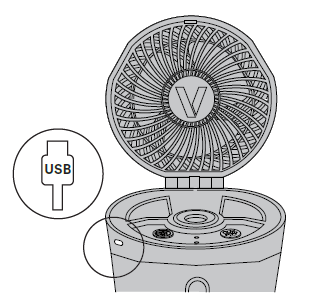
Recharge the battery
Plug the included Micro USB charge cable into a wall outlet to recharge the built-in battery.
The LED will flash red while charging and turn solid red when fully charged.
Water reservoir cleaning
+−
Before you clean
Do not pour water into the misting fan or submerge it in water.
Every day of use
Empty and rinse the inside of the water reservoir before refilling. Wipe the misting fan with a soft damp cloth.
Every week of use
To remove any scale or buildup, use a 50/50 mixture of white vinegar and lukewarm water to clean the inside of the water reservoir and other wet parts.
Ultrasonic atomizer care
+−
Important
Never use detergent to clean the ultrasonic atomizer.
Never clean the ultrasonic atomizer by scraping with a hard object.
Never touch the ultrasonic atomizer with your fingers. Natural oils from skin can damage the atomizer.
Do not pour water or any liquid into the ultrasonic atomizer. Do not submerge in water.
Every day of use
Wipe the ultrasonic atomizer clean with a soft damp cloth.
Every week of use
Make a 50/50 solution of white vinegar and water. Dip a soft bristle brush (not included) into the solution and brush the ultrasonic atomizer. Wipe clean with a soft cloth.
Maintenance
+−
After each use
When finished using the mister, empty and clean the water reservoir, and allow the wick to air dry.
Wick replacement
Change the wick once a season, or more often if necessary. Visit goveer.com to purchase new wicks.
Limited warranty
+−
We've got you covered
Your Misting Fan is guaranteed to be free from any manufacturing defects for a period of 1 year from the date of purchase under normal use and in compliance with the operating instructions.
This warranty is not transferable and extends only to the original retail purchaser, and is only valid when supplied with proof of purchase.
Please retain proof of purchase for this limited warranty.
The warranty is valid only in the original country of purchase.
Coverage details
This warranty is subject to the conditions set out by the country in which the items were purchased. Conditions may vary. Veer will not ship replacement or repair parts out of the country of purchase.
Veer will provide replacement parts or conduct repairs if deemed appropriate by the company. Veer reserves the right to exchange an item for a replacement part. Some parts may be replaced with newer model parts as the Misting Fan is improved over time.
What's not covered
A repair issue will not be covered by this warranty if:
- The issue is caused by misuse or improper / poor maintenance.
- Damage is caused by improper installation of Veer parts and/or accessories.
- Damage is corrosion, mold or rust caused by a lack of maintenance or service.
- Damage is due to general wear and tear from everyday use or negligence.
- Damage is caused by sun intensity, sweat, detergents, damp storage or frequent washing.
- Repairs or modifications are carried out by a third party.
- The Misting Fan is purchased from an unauthorized retailer. Approved retailers are listed at goveer.com.
- The Misting Fan is second-hand.
- The Misting Fan is damaged as a result of an accident, airline or freight damage.
Veer reserves the right to determine whether the terms and conditions of the warranty have been met. For full warranty details, visit goveer.com.
Contact & support
Email: [email protected]