HaulerUpdated 5 days ago
Hauler User Guide
We hope you enjoy your adventures as much as we enjoyed dreaming and building the Hauler. Please review these instructions carefully prior to assembly and use and you will be on your way to move like a family that goes.
Safety warnings
+−
IMPORTANT: KEEP THESE INSTRUCTIONS FOR FUTURE REFERENCE.
NO PERSON (ADULT OR CHILD) MAY RIDE IN OR ON THE HAULER. FOR CHILD PASSENGERS, USE THE VEER CRUISER.
WARNING: TIP-OVER AND LOSS-OF-CONTROL HAZARD
- A high load blocks your view when pushing. Keep your sightline clear or pull instead.
- Never leave a loaded Hauler unattended on any slope. Engage the parking brake and chock the wheels if leaving it on a grade is unavoidable.
Understanding the load rating
The Hauler is rated to pull up to 500 lbs (227 kg) or push up to 300 lbs (136 kg) on smooth, hard, flat ground. The rating covers everything on the Hauler at once, bins and SmartDeck together. It may not be manageable everywhere: the practical limit is whichever comes first, the rating or the load you can start, steer and stop on the ground you're traversing.
- Keep the heaviest items low to prevent tipping on turns or curbs.
- Stay on firm, level ground where possible. Sand, mud, deep grass and gravel require more force to push or pull. Soft ground under one wheel could tilt the load.
- Moving uphill requires more effort to pull, and moving downhill requires you to hold back the load. A side slope pushes the load's center of gravity downhill, which is a common cause of tip-overs.
Before every use
- Confirm all four wheels are fully seated and locked.
- Confirm the handle is locked upright before pushing.
- Engage the foot brake before loading, unloading or leaving the Hauler standing.
- Check the frame, wheels, brake and SmartBins. Do not use with damaged or missing parts.
Folding safety
- Do not let children fold or unfold the Hauler or play near it while you do.
Pet safety
- Before you roll, strap the Dog Pad tight to the SmartDeck by threading its underside straps through the tie-down points.
- If your dog rides in a SmartBin, bungee the bin to the Hauler.
- Keep the pace to a walk with a dog aboard.
- Never leave your dog in the Hauler unattended.
- You know your dog. The Hauler is for the dog who settles in and enjoys the ride, not the one already looking to jump.
Bungee Strap Safety
- Hook one end on before you stretch. A bungee that lets go under tension can hit you.
- Wear eye protection when installing.
- Keep your face and body out of the line of the cord while hooking up.
- Do not stretch a bungee to more than one and a half times its relaxed length.
- Check that the load is secure and cannot shift, fall or become detached.
- Release tension slowly and carefully. Never unhook a strap while it is under significant tension.
- Do not use a damaged bungee. Discard it if the cord is cut, frayed or cracked, or if a hook is bent.
The Hauler overview
+−
Parts
- High-Performance Rubber Handle Grips
- Telescoping Handle Bar Mechanism
- Rugged Rear Wheels
- Accessory Mounts
- Aluminum Frame
- SmartDeck with integrated Tie Down Points
- Handle Lock
- Foot Brake
- Large SmartBin
- Small Hauler Bungees
Setting up the Hauler
+−
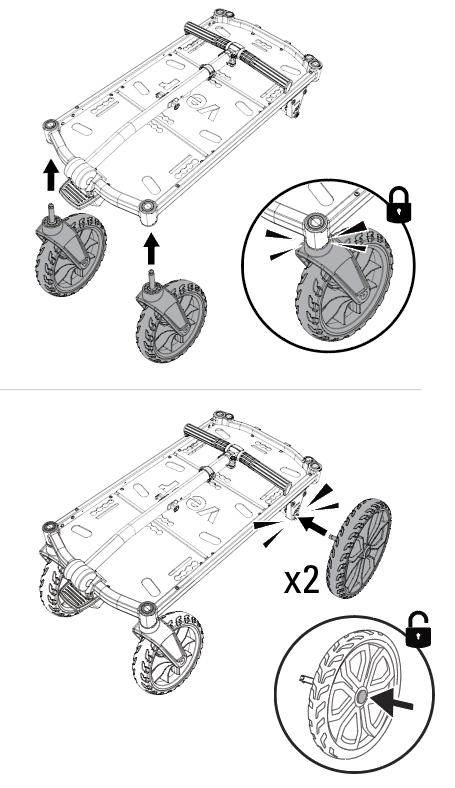
Install
wheels
SWIVEL WHEELS: Insert wheels until you hear a click.
FIXED WHEELS:
Press button in center of wheel and slide into frame until you hear a click.
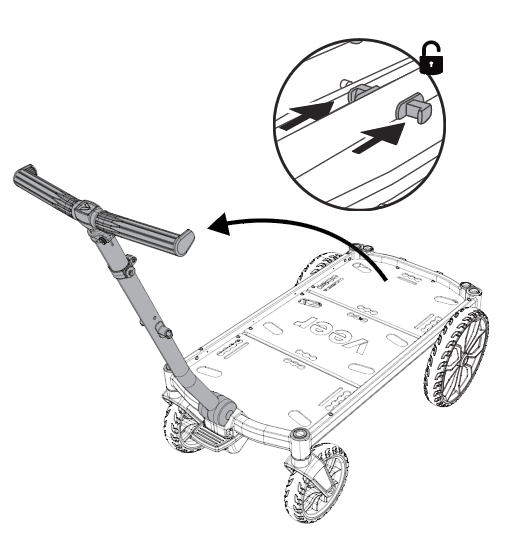
Pulling up
the handle
Pull up on
handle release levers and swing handle up to locked position.
Using the Hauler
+−
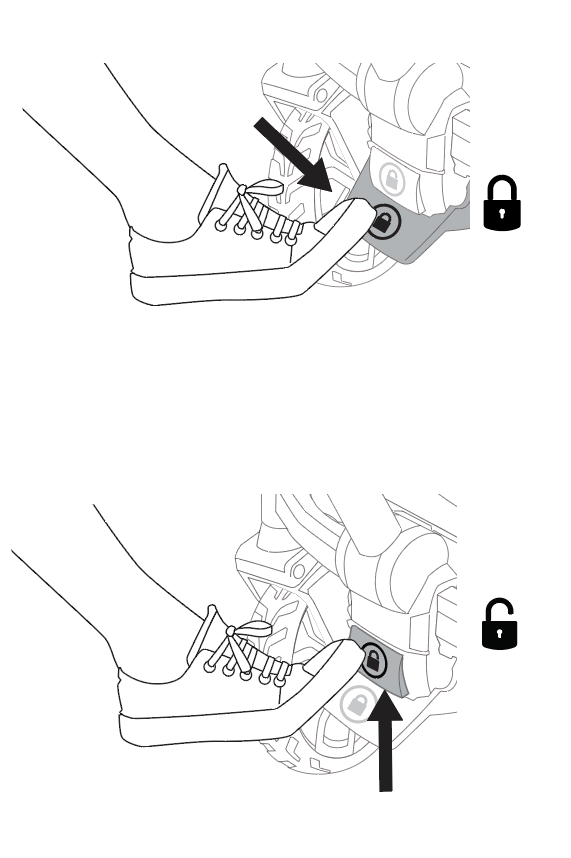
Set foot
brake
To set brake, press gently until it clicks.
To release
brake, gently kick toe plate.
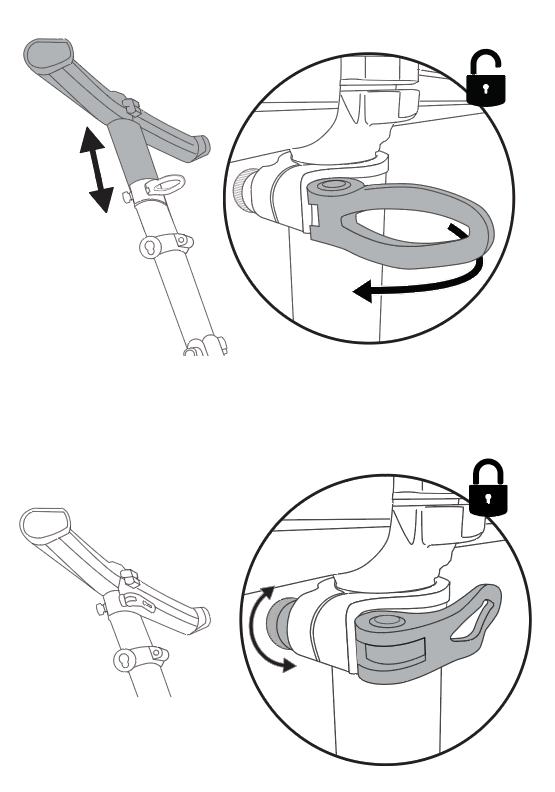
Adjusting the telescopic handle
Unlock to adjust height and lock. Rotate dial to adjust lock
tension.
Lowering the handle to pull
Pull up on handle release levers and lower handle to pull the Hauler behind you. To push again, swing handle up until it locks upright.
Folding the Hauler
Remove the Tabletop, if fitted, and collapse the SmartBin. It can stay on the Hauler. Pull up on handle release levers and fold handle down.
To unfold, pull up on handle release levers and swing handle up to locked position.
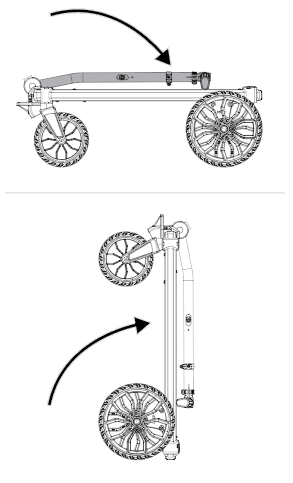
Storing the Hauler
Place on a hard, flat surface when storing in a standing
position.
Installing the SmartBin
+−
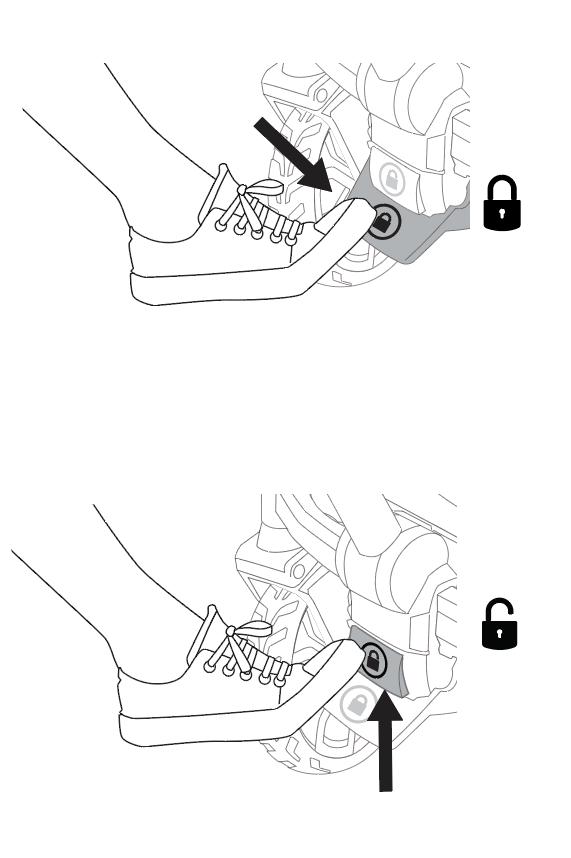
Set foot
brake
To set brake, press gently until it clicks. To release brake, gently kick toe plate.
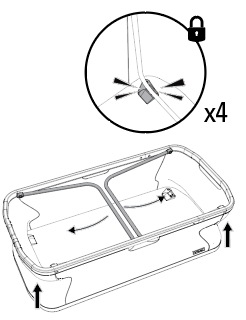
Expand Large SmartBin
Push the two inner tubes outward until they lock into the latches at the bottom of the SmartBin.
Note: To collapse, pull the two inner tubes in to release them from the latches, then fold the walls down flat.
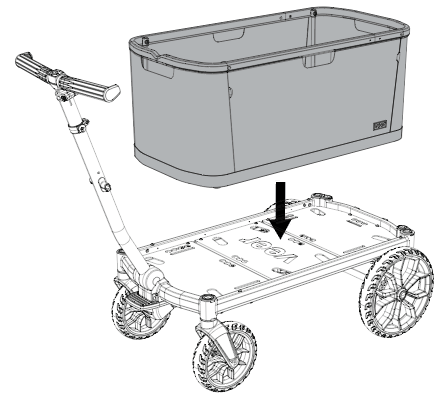
Position Large
SmartBin
Place Large SmartBin with the angled feet on the Hauler.
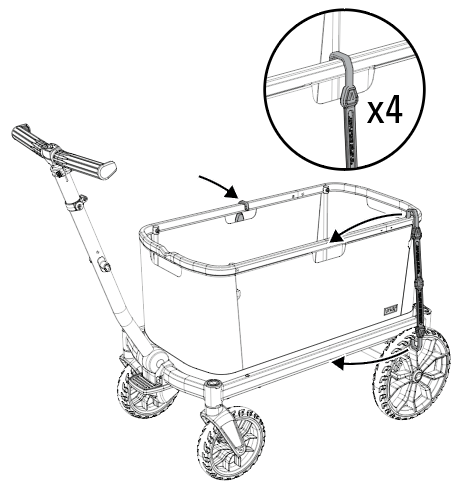
Secure Large
SmartBin
On each side,
hook a bungee over rim of SmartBin and under Hauler SmartDeck.
Stacking multiple SmartBins
+−
Note: One SmartBin included. Additional SmartBins available for purchase.
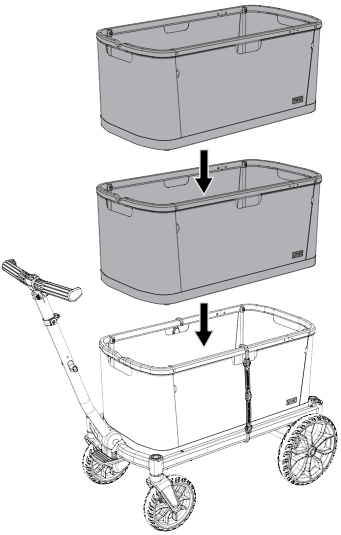
Position SmartBins
Stack additional SmartBins on Hauler (up to three SmartBins).
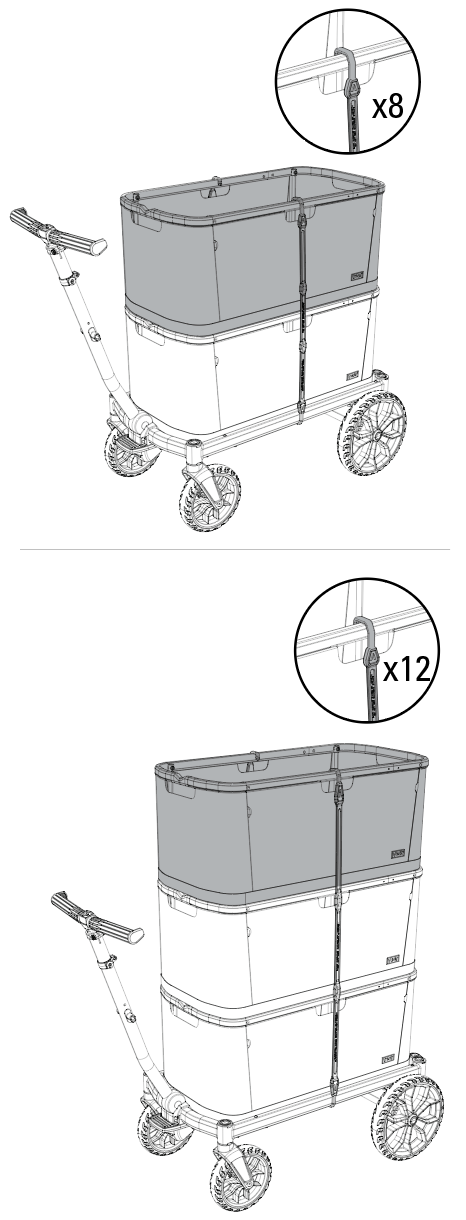
Secure SmartBin stack
On each side, hook a Large Bungee over rim of top SmartBin and under Hauler SmartDeck.
Note: Use the Large Bungees from the Bungee Kit (sold separately) for a stack. The two Small Bungees included with the Hauler are for a single SmartBin.
Cleaning, maintenance, and check-up
+−
Store the Hauler away from direct sunlight and environmental elements. If used outdoors, clean frequently.
Cleaning the Hauler chassis
- If exposed to salt water, rinse thoroughly with fresh (tap) water as soon as possible to avoid corrosion.
Cleaning frame, handle grips & wheels
Wipe with a damp cloth and a mild detergent, then dry thoroughly. Do not use abrasives.
Maintaining the foot brake
- Regularly check that the two brake mounting screws are tight. Loose screws are the most common cause of the brake not engaging fully.
- Inspect the brake cable for fraying or kinks, especially after trips to the beach or exposure to sand. A frayed cable should be replaced before the next use.
- If the brake engages but does not hold the Hauler in place on a slope, stop use and contact [email protected] before using again.
Cleaning SmartBins
- If exposed to salt water, rinse thoroughly with fresh (tap) water as soon as possible to avoid frame corrosion.
- Vacuum or brush away excess sand or dirt.
- Wipe fabric with a damp cloth and a mild detergent, then dry thoroughly. Do not use abrasives.
- Dry bins open and away from direct sunlight before use or storage. Do not bleach, iron or dry clean.
- For an all-over wash, rinse with a hose. Air dry completely before reattaching.
- Never use a power washer on the SmartBins.
Routine maintenance
- Regularly check all connecting hardware (rivets, screws, etc.) for tightness and security. Inspect the brake, wheels and tires and replace or repair as necessary.
- Only Veer replacement parts should be used. It may be unsafe to use parts supplied by another manufacturer.
- Contact customer service with any repair or maintenance questions at [email protected].
Limited warranty
+−
We've got you covered
This product is guaranteed to be free from any manufacturing defects for a period of 2 years from the date of purchase under normal use and in compliance with the operating instructions.
This warranty is not transferable and extends only to the original retail purchaser, and is only valid when supplied with proof of purchase. Please retain your proof of purchase for this limited warranty.
Coverage details
The warranty is valid only in the original country of purchase and is subject to the conditions set out by that country. Conditions may vary. Veer will not ship replacement or repair parts out of the country of purchase.
Veer will provide replacement parts or conduct repairs if deemed appropriate by the company. Veer reserves the right to exchange an item for a replacement part. Some parts may be replaced with newer model parts as the product is improved over time.
What's not covered
A repair issue will not be covered by this warranty if:
- The issue is caused by misuse or improper / poor maintenance. Please refer to this instruction booklet for guidance on use and maintenance.
- Damage is caused by improper installation of Veer parts and/or accessories. Please refer to this instruction booklet for guidance on assembly and use.
- Damage is corrosion, mold, or rust caused by a lack of maintenance or service.
- Damage is due to general wear and tear from everyday use or negligence.
- Damage is caused by sun intensity, sweat, detergents, damp storage, or frequent washing.
- Repairs or modifications are carried out by a third party.
- The product is purchased from an unauthorized retailer. Approved retailers are listed at goveer.com.
- The product is second-hand.
- The product is damaged as a result of an accident, airline, or freight damage.
Veer reserves the right to determine whether the terms and conditions of the warranty have been met. For full warranty details, visit goveer.com.
Need help? Email [email protected].