Cruiser XLUpdated a month ago
First 10 minutes
New to the Cruiser XL? Here's the fastest path from box to adventure.
Adjusting the harness, telescopic handle, push/pull modes, folding, and wheel removal are covered separately below. Read the safety warnings before your first ride.
Safety warnings
+−
Never leave children unattended. Failure to follow these warnings and instructions could result in serious injury or death. Read this instruction manual before use.
Age & weight limits
- This seat unit is not suitable for children under 6 months. Use a harness as soon as your child can sit unaided.
- The Cruiser XL seats up to four children from 6 months to 25 kg (55 lbs) and a maximum height of 114 cm (45 in) each (100 kg / 220 lbs total).
- The Cruiser XL is suitable from birth with the optional Veer infant car seat adapter and a user-supplied car seat.
- The cargo weight limit (without children) is 113 kg (250 lbs).
- Maximum carrying capacity of each side pocket is 0.9 kg (2 lbs).
- Maximum cup holder weight is 0.9 kg (2 lbs). Excessive weight may create a hazardous, unstable condition. Do not place hot liquids in the holder.
Before every ride
- Always use the restraint system.
- Ensure that all locking devices are engaged before use.
- Always make sure the Cruiser XL is fully open and locked before use.
- Check that the Cruiser XL, seat unit, or car seat attachment devices are correctly engaged before use.
- The brake must be locked while taking a child or children in or out of the Cruiser XL.
While riding
- To prevent injury, children must remain seated with their arms and legs inside the Cruiser XL while riding.
- Passengers must always be seated while the Cruiser XL is in use and should always use the complete 3-point harness.
- Never park the Cruiser XL on a hill with children inside.
- Do not use the Cruiser XL without the rear wheel safety fenders in place, and always keep hands away from moving wheels.
- Always keep fingers away from moving parts when folding, unfolding, or adjusting the Cruiser XL to prevent entrapment or pinching.
Where not to use
- This product is not suitable for running or skating.
- The Cruiser XL should never be used while ascending or descending stairs, or using an escalator.
- Do not sit or stand on the side wall panels of the Cruiser XL.
- Do not sit or stand on the folded seat backs of the Cruiser XL.
- Ascend curbs in pull mode. Do not attempt to push onto curbs.
Modifications, handling & transport
- To avoid injury, ensure that your child is kept away when unfolding and folding this product.
- Do not let your child play with this product.
- Do not make any alterations or modifications to the Cruiser XL with products not supplied by the manufacturer, as this may cause instability or structural damage not covered under warranty.
- The unit may become unstable if the manufacturer's recommended load is exceeded, or if a parcel bag or an accessory other than that recommended by the manufacturer is used or hung from the unit.
- Lock the brake before transporting the Cruiser XL in a car.
Standards compliance
This product is designed and manufactured to comply with ASTM F833 Standard Consumer Safety Performance Specification for Carriages and Strollers.
The Cruiser XL overview
+−
The Cruiser XL has been crafted with the finest workmanship and highest quality materials. Every innovative detail was intentionally designed to give you the highest performance, superior functionality, and an incredible ride!
The Veer Cruiser XL seats up to four children from 6 months to 25 kg (55 lbs) and a maximum height of 114 cm (45 in) each (100 kg / 220 lbs total). It is suitable from birth with the optional Veer infant car seat adapter and a user-supplied car seat.
Parts
- High Performance Rubber Handle Grips
- Telescoping Handle Bar Mechanism
- Removable Snack and Drink Tray
- One-Handed Seat Fold Down
- Safety Fenders
- Rugged Rear Wheels
- Accessory Mounts
- Accessory Wells with Plugs
- Foot Well and Drain
- Fabric Side Panels
- Front Swivel Wheels
- Removable Cup Holder
- Aluminum Frame
- Handle Lock
- Foot Brake
- 3-Point Seat Harness
- Removable Foot Well Insert
- Side Storage Pockets
Using your Cruiser XL
+−
Follow these steps to set up and use your Cruiser XL. Always ensure all locking devices are fully engaged before placing children in the wagon.
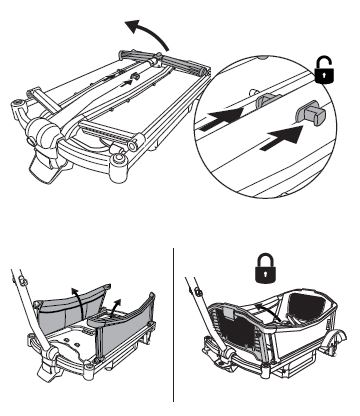
Open the Cruiser XL frame
Pull up on the handle release levers and swing the handle up to the locked position. Pull the side panels up, followed by the front and seat backs, into the locked position.
✓ Make sure every panel clicks into its locked position before loading.
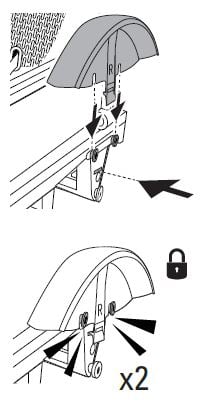
Install safety fenders
With the handle closest to your body, the Cruiser XL has a left and a right side. The fenders are coded "L" and "R".
Make sure the tab at the bottom of the fender locks securely into the open slot in the rear axle mount.
✓ Do not use the Cruiser XL without rear wheel safety fenders in place.
Before each ride, briefly inspect both fenders for cracks — particularly around the lower tab and the area near the axle mount. Cracked fenders are covered under the 2-year warranty.
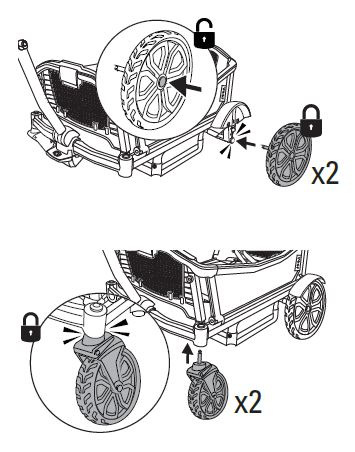
Install the wheels
Rear wheels: Press the button in the center of the wheel and slide it into the frame until you hear a click.
Front swivel wheels: Attach the front wheels until you hear a click.
✓ Tug each wheel gently to confirm it's locked in place. If a wheel rattles or wobbles after clicking in, remove it, re-seat it, and tug again. Persistent looseness or wheel hardware failure is covered under the 2-year warranty.
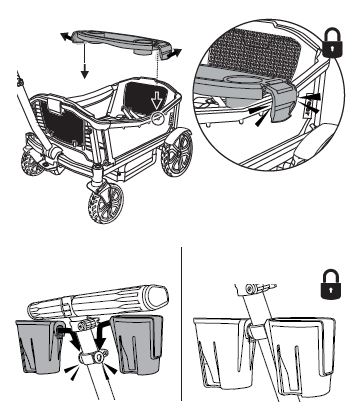
Install tray & cup holders
The tray must be centrally located on the side wall rail. Locate the center pin under the frame of the right and left sidewall rails. Rest the tray above those pins and push the sides of the tray to clamp it in place.
✓ The tray should sit level and not shift when nudged side to side.
Maximum cup holder weight is 0.9 kg (2 lbs). Do not place hot liquids in the holder.
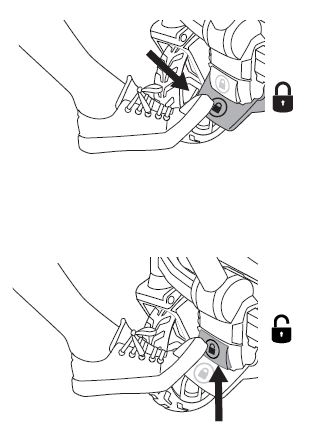
Set the foot brake
To set the brake: Press gently until it clicks.
To release the brake: Gently kick the toe plate.
✓ Always lock the brake before loading or unloading children.
Periodically check that the brake cable feels taut and the brake engages with a firm click. If the cable feels loose, frayed, or the brake is slow to engage, stop use and contact [email protected] — brake cable issues are covered under the 2-year warranty.
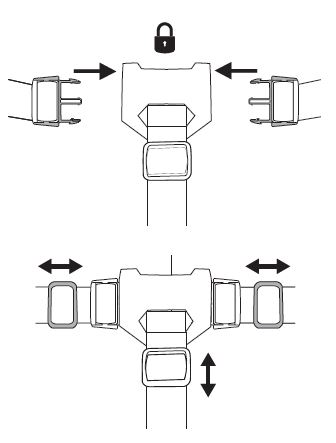
Adjust the 3-point harness
Adjust the harness and shoulder straps to fit your child comfortably.
Always use the complete 3-point harness to prevent injury from falling or sliding out. Use a harness as soon as your child can sit unaided.
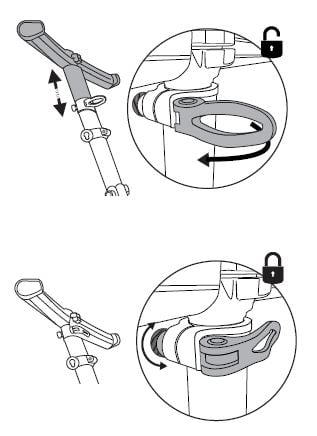
Adjust the telescopic handle
Unlock the handle to adjust the height, then lock it in place. Rotate the dial to adjust the lock tension.
✓ The handle should feel firm and not shift when pressure is applied.
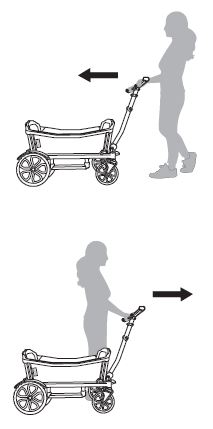
Push & pull-along modes
Push mode: Lock the handle bar upright.
Pull-along mode: Lock the handle bar upright.
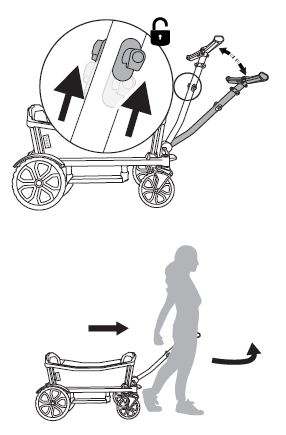
Pull mode
Unlock and drop the handle bar.
Ascend curbs in pull mode — do not attempt to push onto curbs.
Storing your Cruiser XL
+−
Follow these steps to safely fold and store your Cruiser XL. Always keep fingers away from moving parts when folding to prevent pinching.
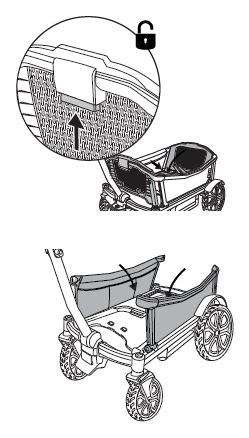
Folding
Remove accessories. Lift the release button on the back of the front and back seats and fold the seats down flat. Fold each side panel down until it lays flat. Release the handle and lay it down until it locks.
Always keep fingers away from moving parts when folding to prevent pinching.
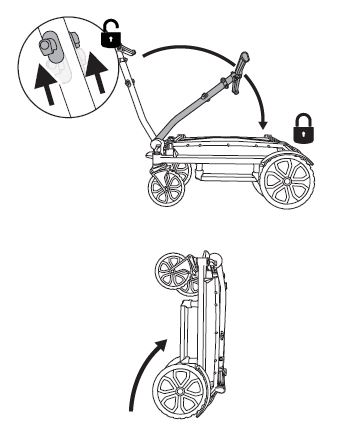
Storing upright
Place the Cruiser XL on a hard, flat surface when storing it in a standing position.
Ensure stability prior to leaving the Cruiser XL unattended in its folded position.
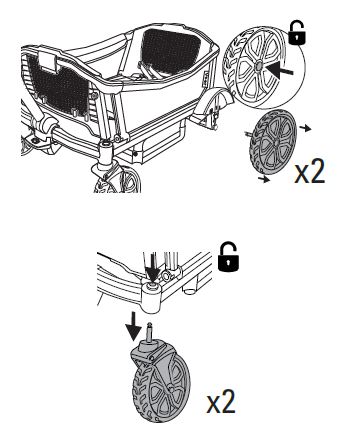
Removing the wheels
Remove the wheels for ultimate compactness during storage or transport.
The Cruiser XL can be lifted and carried by holding its frame, or by holding the handle when in the down and locked position.
Cleaning, maintenance & check-up
+−
Store the Cruiser XL out of direct sunlight and away from environmental elements. If used outdoors, we recommend frequent cleaning.
The Cruiser XL chassis
- If chassis parts have been exposed to salt water, rinse thoroughly with fresh (tap) water as soon as possible to avoid corrosion.
- If exposed to sand, use a soft brush to gently brush sand from the parts, then cycle the components and brake until the sand is ejected and they move freely.
- For an all-over wash, remove accessories and wheels and rinse with a hose. Allow wheels and accessories to completely air dry before reattaching.
- Never use a power washer on the Cruiser XL.
Frame, seats, handle grips, fenders & wheels
Wipe with a damp cloth and a mild detergent, then dry thoroughly. Do not use abrasives.
Soft-sided panels
Wipe with a damp cloth and a mild detergent, then dry thoroughly. Do not use abrasives. Panels may also be removed for hand washing in cold water with mild detergent. Dry flat and away from direct sunlight before re-use or storage.
Do not bleach, iron, or dry clean.
Snack tray & cup holders
Wash in a sink or with a hose, or wipe with a damp cloth and a mild detergent, then dry thoroughly. Do not use abrasives.
Harness straps
Remove and hand wash in cold water with mild detergent. Dry flat and away from direct sunlight before re-use or storage.
Do not bleach, iron, or dry clean.
Time for a check-up
The Cruiser XL requires routine user maintenance. Run through this inspection before every outing — it takes less than a minute and catches the issues that most commonly need attention.
- Brake cable: With the brake engaged, check that the cable feels taut along its full length. A loose, frayed, or slow-to-engage brake should be addressed before use — contact [email protected].
- Fenders: Inspect both fenders for cracks, particularly around the lower tab and the axle mount area. Replace cracked fenders before the next ride.
- Wheels: Tug all four wheels to confirm they are seated. Listen for rattling on the first few steps — if a wheel shifts or clicks during use, remove, re-seat, and recheck.
- Handle: Apply light side-to-side pressure on the handle bar. It should feel firm with no shift or creak. If it feels loose, adjust the dial tension (see Step 7).
- Harness buckles and hardware: Click and release each buckle to confirm it latches cleanly. Check that all rivets and screws are tight. Never continue to use a product that is structurally unsound.
Only Veer replacement parts should be used. Brake cable wear, cracked fenders, and wheel hardware failure are all covered under the 2-year limited warranty — if anything on this list looks wrong, contact [email protected] before your next ride.
Limited warranty
+−
We've got you covered
The Cruiser XL is guaranteed to be free from any manufacturing defects for a period of 2 years from the date of purchase under normal use and in compliance with the operating instructions.
This warranty is not transferable and extends only to the original retail purchaser, and is only valid when supplied with proof of purchase.
Please retain proof of purchase for this limited warranty.
Coverage details
The warranty is valid only in the original country of purchase and is subject to the conditions set out by that country. Conditions may vary. Veer will not ship replacement or repair parts out of the country of purchase.
Veer will provide replacement parts or conduct repairs if deemed appropriate by the company. Veer reserves the right to exchange an item for a replacement part. Some parts may be replaced with newer model parts as the Cruiser XL is improved over time.
For full warranty details, visit goveer.com.
Contact & support
Email: [email protected]