Bike Connector for HaulerUpdated 23 minutes ago
Bike Connector for Hauler User Guide
We hope you enjoy your adventures as much as we enjoyed dreaming and building the Hauler. Please review these instructions carefully prior to assembly and use and you will be on your way to move like a family that goes.
Safety warnings
+−
IMPORTANT: KEEP THESE INSTRUCTIONS FOR FUTURE REFERENCE.
- Check the axle mount, tow bar and security pins before every ride.
- Remove the swivel wheels before towing.
- Never tow with a person aboard.
- When towing with a dog, keep your speed down and stick to smooth ground. This is for a dog who settles in for the ride, not one who might decide to hop out. Never leave a pet unattended in the carrier.
- Never ride a bicycle at night without adequate lighting.
- Pulling the Hauler may alter the riding characteristics of the bicycle, particularly regarding steering and braking.
- Not rated for use on public roads.
- Maximum load for the Bike Connector is 48.5 lbs. (22 Kg).
- Maximum speed for the Bike Connector is 15.5 MPH (25 KPH).
The Hauler Bike Connector overview
+−
Parts
- Hitch mount
- Tow bar
- Bike hitch
- Safety flag
- Safety flag plug
- Security strap
- Security pins (2)
- Socket-cap screws (4)
Installing the Bike Connector
+−
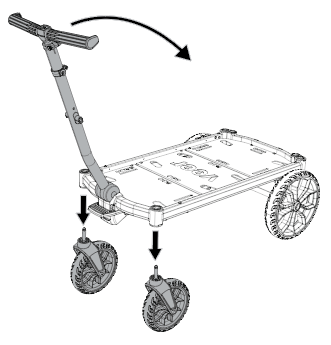
Prepare Hauler
Remove front swivel wheels.
Fold down handle.
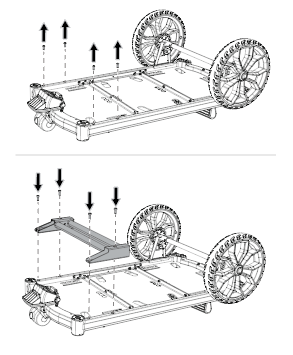
Attach hitch mount
Flip Hauler over and remove four hex-head bolts on bottom of Hauler.
With angled edge facing forward, align hitch mount with bottom of Hauler and secure with four socket-cap screws.
Tighten hitch mount bolts to 5.0-5.5 Nm (44-49 In-Lb). Do NOT over-tighten. Over-tightening the hitch mount bolts can lead to failure and will void the warranty.
Always mount bike hitch mount on the front (handle side) of the frame.
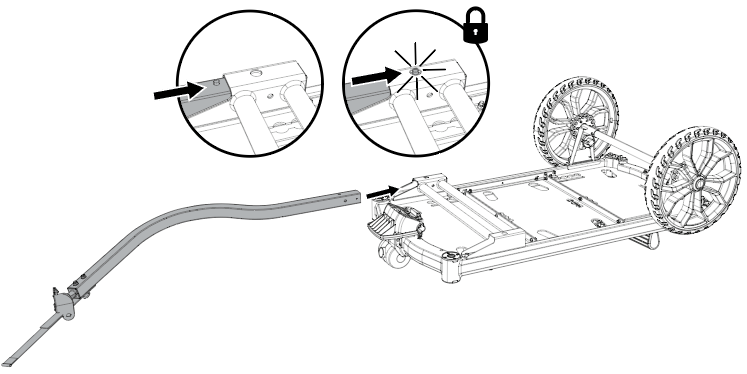
Install tow bar
Press tow bar button and slide into hitch mount until button clicks into
place.
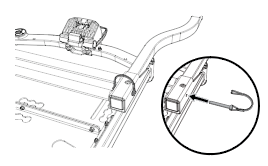
Secure tow bar
Slide security pin through hole on side of mount and tow bar.
Flip loop over pin end to lock in place.
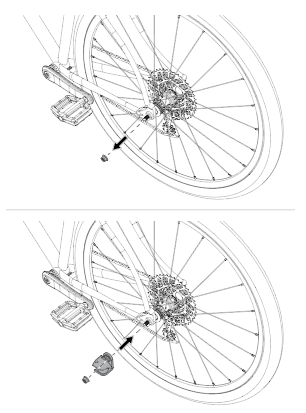
Install bike hitch (bolt-on axle)
Remove axle nut from rear wheel, place hitch on axle, then replace axle nut
to secure.
NOTE: For quick-release axles, see step 6.
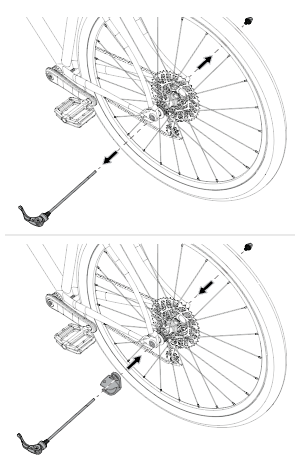
Install
bike hitch (quick-release axle)
Pull quick-release lever open. Holding lever in
place, loosen nut on opposite side of axle, then pull apart.
Slide hitch onto quick-release skewer, slide skewer back through wheel, then replace axle nut and push quick-release lever closed to secure.
NOTE: For bolt-on axles, see step 5.
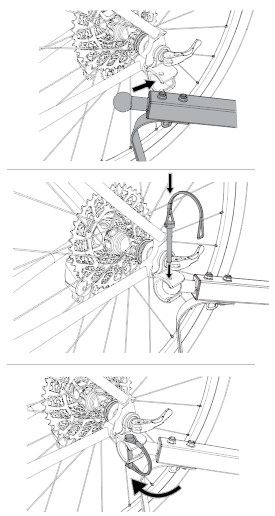
Attach tow bar to hitch
Turn Hauler upright, then slide ball end of tow bar into hitch.
Insert security pin into hitch, then flip loop over pin end to lock in place.
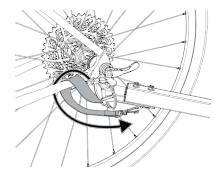
Secure strap
Wrap security strap over bicycle frame, then secure spring clip to ring on
bottom of tow bar.
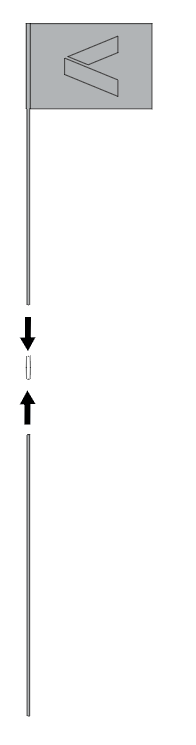
Connect safety flag
Connect upper and lower flagpoles to connector.
NOTE: The safety flag is a requirement on bike trailers.
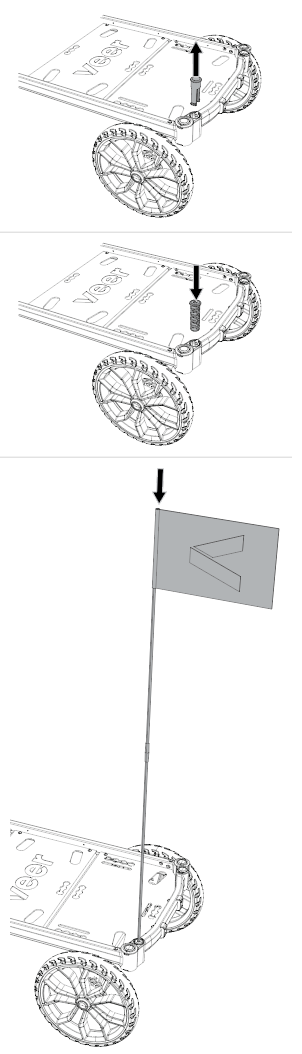
Install
safety flag
Remove port plug from rear accessory port.
Slide flagpole into flag port.
Cleaning, maintenance, and check-up
+−
Wipe with a damp cloth and dry thoroughly. For a more thorough cleaning, rinse with a hose or hand wash with a mild detergent and dry thoroughly.
Do not use abrasives.
Limited warranty
+−
We've got you covered
This product is guaranteed to be free from any manufacturing defects for a period of 2 years from the date of purchase under normal use and in compliance with the operating instructions.
This warranty is not transferable and extends only to the original retail purchaser, and is only valid when supplied with proof of purchase. Please retain your proof of purchase for this limited warranty.
Coverage details
The warranty is valid only in the original country of purchase and is subject to the conditions set out by that country. Conditions may vary. Veer will not ship replacement or repair parts out of the country of purchase.
Veer will provide replacement parts or conduct repairs if deemed appropriate by the company. Veer reserves the right to exchange an item for a replacement part. Some parts may be replaced with newer model parts as the product is improved over time.
What's not covered
A repair issue will not be covered by this warranty if:
- The issue is caused by misuse or improper / poor maintenance. Please refer to this instruction booklet for guidance on use and maintenance.
- Damage is caused by improper installation of Veer parts and/or accessories. Please refer to this instruction booklet for guidance on assembly and use.
- Damage is corrosion, mold, or rust caused by a lack of maintenance or service.
- Damage is due to general wear and tear from everyday use or negligence.
- Damage is caused by sun intensity, sweat, detergents, damp storage, or frequent washing.
- Repairs or modifications are carried out by a third party.
- The product is purchased from an unauthorized retailer. Approved retailers are listed at goveer.com.
- The product is second-hand.
- The product is damaged as a result of an accident, airline, or freight damage.
Veer reserves the right to determine whether the terms and conditions of the warranty have been met. For full warranty details, visit goveer.com.
Need help? Email [email protected].