Beach Wheel KitUpdated 2 months ago
First 5 minutes
New to Beach Wheels? Here's the fastest path from box to beach.
Cleaning, maintenance, and warranty details can be found below.
Safety warnings
+−
Warning — read before use
Never leave your child unattended. Failure to follow these warnings and instructions could result in serious injury or death.
Child safety
- Always use the restraint system.
- To avoid injury, ensure that your child is kept away when installing or removing Beach Wheels.
- Do not let your child play with this product.
- Do not allow children to play in the bag.
Attachment & locking
- Ensure that all locking devices are engaged before use.
- Check that the pram body, seat unit, or car seat attachment devices are correctly engaged before use.
Use & handling
- This product is not suitable for running or skating.
- With the front swivel wheels removed, the Cruiser is less stable in its upright/standing position — please keep a hand on it to prevent it from falling over.
Using your Beach Wheels
+−
Follow these steps to install your Beach Wheels on the Cruiser. Always keep a hand on the Cruiser while swapping wheels to prevent it from tipping.
Before you go
When using Beach Wheels, always pull the Cruiser when loaded — do not use in push mode. Total weight should not exceed 110 lbs (50 kg).
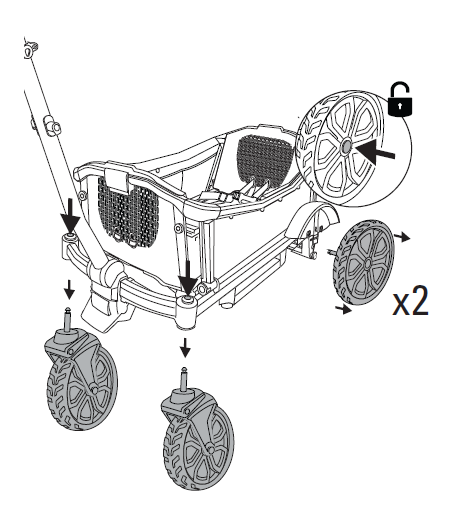
Remove Cruiser wheels
Rear wheels: Press the button in the center of the wheel and slide off the frame.
Front swivel wheels: Press the button on top of the front wheel and pull down to remove the wheel from the frame.
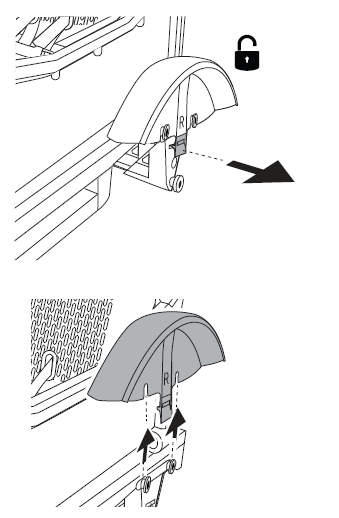
Remove Cruiser fenders
Pull out the tab on the bottom of the fender to unlock, then lift the fender up off the frame.
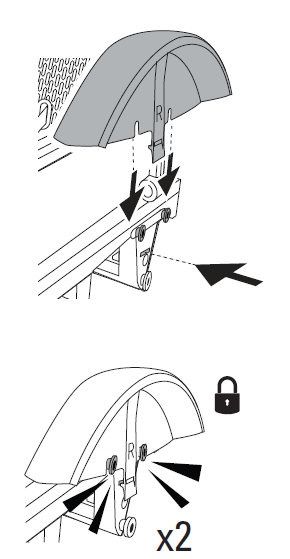
Install Beach XL fenders
When looking at the Cruiser with the handle closest to your body, there is a left and right side. Fenders are labelled "L" and "R".
✓ Make sure the tab at the bottom of the fender locks securely into the open slot in the rear axle mount.
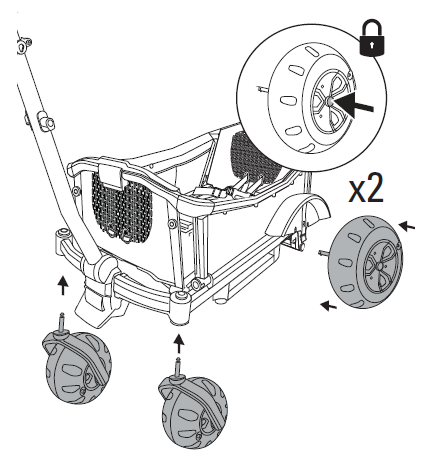
Install Beach wheels
Large Beach wheels (back): Press the button in the center of the wheel and slide into the frame until you hear a click.
Swivel Beach wheels (front): Attach the front wheels until you hear a click.
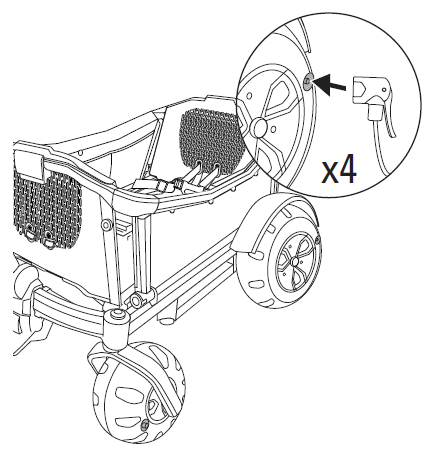
Inflate Beach wheels
Use a standard bike pump to inflate your Beach wheels. Tires should be firm with a small amount of give.
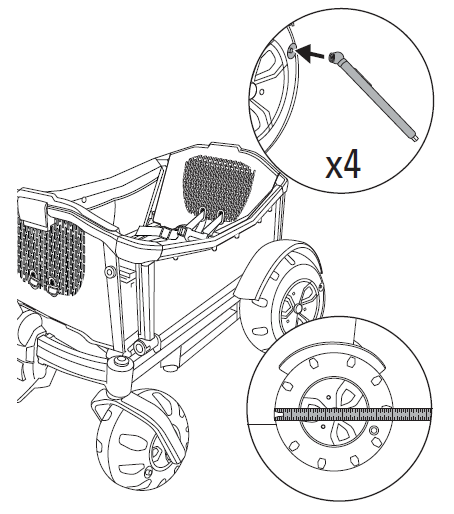
Check tire pressure
Use a tire pressure gauge to make sure wheels are between 2–3 psi.
If a gauge is not available, you can approximate pressure by measuring tire diameter. Diameter should be 8.6 in. (220 mm) for Swivel Beach Wheels and 14.1 in. (360 mm) for Large Beach Wheels.
Cleaning & maintenance
+−
Routine cleaning
Rinse the area to be cleaned thoroughly with clean water, then sponge gently using a mild detergent. Wash off sand gently with a hose. Do not use bleach.
Limited Warranty
+−
We've got you covered
This accessory is guaranteed to be free from any manufacturing defects for a period of 1 year from the date of purchase under normal use and in compliance with the operating instructions.
This warranty is not transferable and extends only to the original retail purchaser and is only valid when supplied with proof of purchase.
Please retain proof of purchase to activate this limited warranty.
The warranty is valid only in the original country of purchase and is subject to the conditions set out by the country in which the items were purchased. Conditions may vary. Veer will not ship replacement or repair parts out of the country of purchase.
Veer will provide replacement parts or conduct repairs if deemed appropriate by the company. Veer reserves the right to exchange an item for a replacement part. Some parts may be replaced with newer model parts as Beach Wheels are improved over time.
What's not covered
A repair issue will not be covered by this warranty if:
- The issue is caused by misuse or improper/poor maintenance. Please refer to this instruction guide for guidance on use and maintenance.
- Damage is caused by improper installation of Veer parts and/or accessories.
- Damage is corrosion, mold, or rust caused by a lack of maintenance or service.
- Damage is due to general wear and tear resulting from everyday use or negligence.
- Damage is caused by the intensity of the sun, sweat, detergents, damp storage, or frequent washing.
- Repairs or modifications are carried out by a third party.
- Beach Wheels are purchased from an unauthorized retailer. Approved retailers are listed at goveer.com.
- Beach Wheels are second-hand.
- Beach Wheels are damaged as a result of an accident, airline, or freight damage.
Veer reserves the right to determine whether or not the terms and conditions of the warranty have been met. Please contact Veer with any warranty questions.
For full warranty details, visit goveer.com
Contact & support
Phone: 470-344-3200 · Email: [email protected]