&Jog Jogging FrameUpdated 9 months ago

&Jog Jogging Frame User Guide
![]() WARNING
WARNING
NEVER LEAVE CHILDREN UNATTENDED. FAILURE TO FOLLOW THESE WARNINGS AND INSTRUCTIONS COULD RESULT IN SERIOUS INJURY OR DEATH.
Always use Veer Switchback Seat with &Jog jogging frame to create a complete Switch&Jog jogger. Optional accessories are required for additional modes that are not covered in this instruction manual.
This jogger is intended to be used with one child only.
Never leave a child unattended in the &Jog jogger.
To prevent injury, children must remain seated with their arms and legs inside the Switch&Jog jogger while riding.
This &Jog jogging frame is suitable for children from birth (with optional infant soft accessory or infant car seat adapter) until child is 50 lbs. (22.5 kg), and child height is 45 in (114 cm).
Maximum weight for the storage basket is 30 lbs (13.5 kg). Excessive weight may cause a hazardous unstable condition to exist.
Maximum weight of cupholder (sold separately) is 1 lb.
Unit may become unstable if manufacturer’s recommended load is exceeded, or if parcel bag or accessory other than that recommended by the manufacturer is used or hung from the unit.
Never park Switch&Jog jogger on a hill with child or children inside.
The brake must be locked while taking the child or children in or out of the Switch&Jog jogger.
Always make sure Switch&Jog jogger is fully open and locked before use.
The Switch&Jog jogger should never be used while ascending or descending stairs or using an escalator.
Do not make any alterations or modifications to the Switch&Jog jogger with products not supplied by the manufacturer, as this may cause instability or structural damage not covered under warranty.
To avoid serious injury from falling or sliding out, passengers must always be seated while Switch&Jog jogger is in use, and always use complete 5-point harness.
Bumper bar must be attached at all times.
Always keep fingers away from moving parts when folding, unfolding, or adjusting the Switch&Jog jogger to prevent entrapment or pinching.
Fall hazard from tip over. Before running, jogging, or walking fast, lock the front wheel from swiveling.
THIS PRODUCT IS DESIGNED AND MANUFACTURED TO COMPLY WITH ASTM F833 STANDARD CONSUMER SAFETY PERFORMANCE SPECIFICATION FOR CARRIAGES AND STROLLERS.
&Jog Jogging Frame Overview
The &Jog jogging frame has been crafted with the finest workmanship and highest quality materials. Every innovative detail was intentionally designed to give you the highest performance, superior functionality and an incredible ride!
01. Multi-position handle height adjust
02. Handle mounted fold actuators
03. Handle mounted deceleration brake
04. Removable oversized rear wheels
05. Large storage basket with multiple storage pouches
06. Locking front wheel for jogging
07. Performance designed rubber grips
08. Front swivel adjustment (if needed for periodic maintenance)
09. Jogger safety strap
Cleaning & General Maintenance
Store your &Jog jogging frame in a location that is out of direct sunlight and environmental elements.
FRAME, SEATS, HANDLE GRIPS AND WHEELS:
Wipe with a damp cloth and a mild detergent and dry thoroughly. The basket is also hose washable. DO NOT use abrasives.
If the &Jog jogging frame chassis parts have been exposed to salt water, we recommend that they be rinsed with fresh (tap) water as soon as possible to avoid corrosion.
If your &Jog jogging frame has been exposed to sand, use a soft brush to gently brush sand from &Jog jogging frame parts and cycle the components until the sand is ejected and the components cycle freely.
If your &Jog jogging frame is in need of an all over wash, remove accessories, wheels and rinse with hose. Allow to completely air dry. Allow wheels to dry completely before re-installing.
NEVER use a power washer on your &Jog jogging frame.
JOGGER BASKET:
Wipe with a damp cloth and a mild detergent and dry thoroughly. Alternatively, the basket is hose-washable. DO NOT use abrasives. Basket may also be removed for hand washing in cold water with mild detergent. Dry flat and away from direct sunlight before re-use or storage. DO NOT bleach, iron or dry clean.
Time for a Check-Up
The &Jog jogging frame requires routine user maintenance.
- Regularly check all connecting hardware (rivets, screws, etc.) for tightness and security. Inspect brake, wheels and tires and replace or repair as necessary.
- Check all safety devices, locks and harnesses for correct and secure operation. Never continue to use a product that is structurally unsound.
- Only Veer replacement parts should be used. It may be unsafe to use parts supplied by another manufacturer.
- Contact Customer Service with any repair or maintenance questions at [email protected].
LIMITED WARRANTY
We’ve got you covered!
The &Jog jogging frame is guaranteed to be free from any manufacturing defects for a period of 2 years from the date of purchase under normal use and in compliance with the operating instructions.
This warranty is not transferable and extends only to the original retail purchaser and is only valid when supplied with proof of purchase.
PLEASE RETAIN PROOF OF PURCHASE FOR THIS LIMITED WARRANTY.
The warranty is valid only in the original country of purchase. This warranty is subject to the conditions set out by the country in which the items were purchased. Conditions may vary. Veer will not ship replacement or repair parts out of the country of purchase.
Veer will provide replacement parts or conduct repairs if deemed appropriate by the company.
Veer reserves the right to exchange an item for a replacement part. Some parts may be replaced with newer model parts as the &Roll stroller frame is improved over time.
For full set of warranty details, visit goveer.com
SETTING UP & USING YOUR &JOG JOGGING FRAME
01. OPEN &JOG JOGGING FRAME
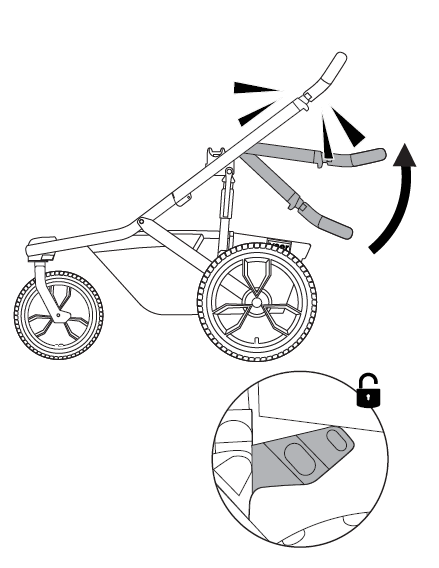
Press tab by the back wheel to release frame, then pull handle up until it locks in place.
02. REAR WHEELS
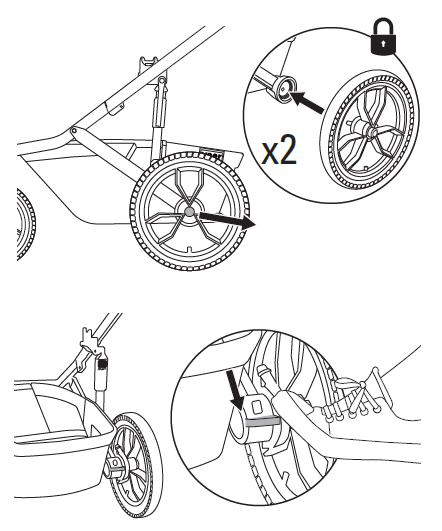
INSTALL/REMOVE: Slide wheel into frame until it clicks in place. Press button to remove.
LOCK/UNLOCK: Press gently on the parking brake pedal to secure stroller when not in motion.
Red indicator=locked. Green=unlocked.
03. ADJUST FRONT WHEEL
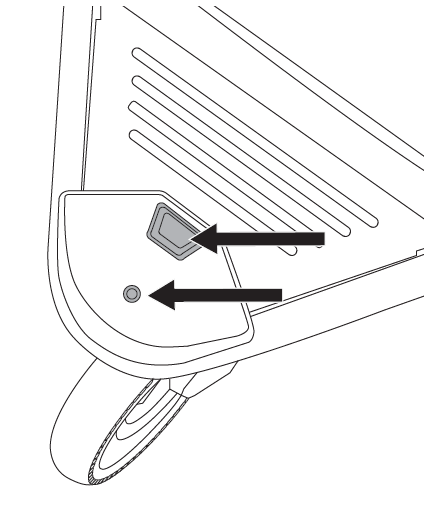
LOCK/UNLOCK: Press button on top to set swivel lock.
REDUCE WOBBLE: Hold front wheel in place. Turn bolt clockwise 2-3 revolutions. Repeat as needed to eliminate wobble, and stop when you feel resistance. DO NOT EXCEED HARD STOP.
REDUCE STEERING FRICTION: Turn bolt counter-clockwise 2-3 revolutions. Stop when you feel resistance.
04. ADJUST FRONT WHEEL TRACKING
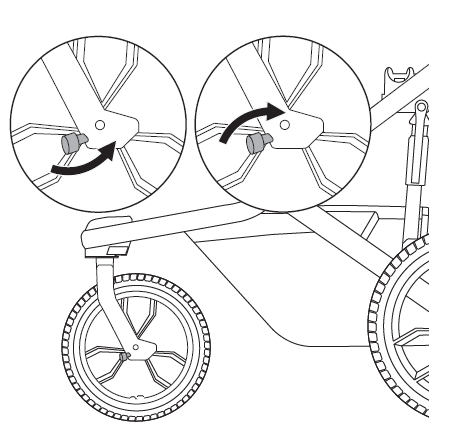
To adjust front wheel tracking, turn knob by the fork to tune it.
05. ADJUST HANDLE HEIGHT
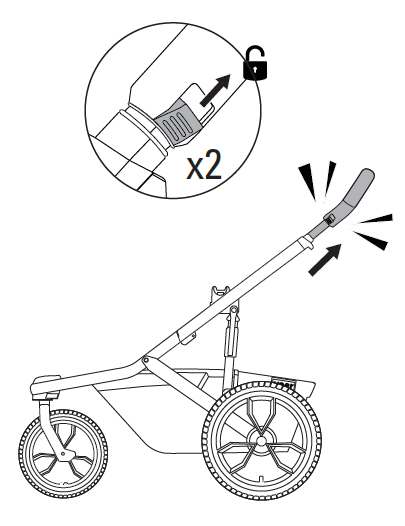
Press height adjuster button on each side of the handle and pull to one of five positions.
06. ADJUST SUSPENSION
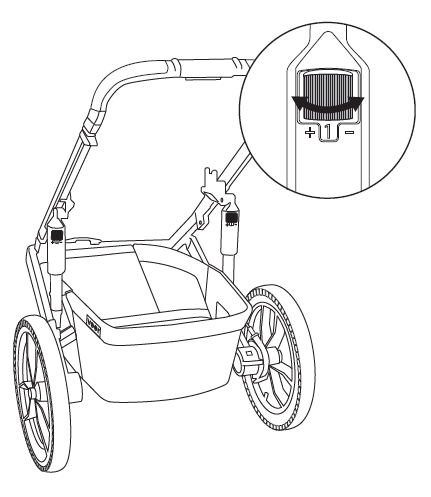
Rotate knob on the shock absorber to pick from 6 positions. 1=soft. 6=firm.
07. ADJUST BRAKE SENSITIVITY
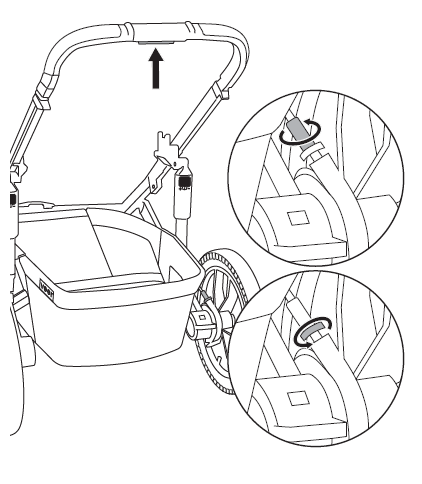
To increase sensitivity, turn barrel adjuster counter-clockwise. Gap between brake housing and lock nut will widen. Turn once or twice, then test. Once desired sensitivity is reached, lockbarrel adjuster position by turning lock nut clockwise until gap is gone. NOTE: You may have to hold barrel adjuster in place as you turn the lock nut.
To activate the brake, press and hold the handle bar button.
08. MANAGE STORAGE
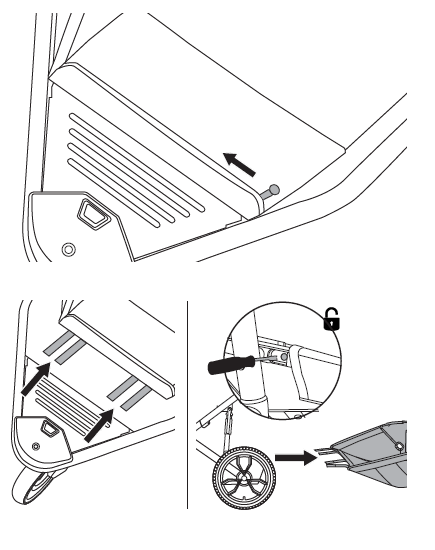
FRONT POCKET: Zip or unzip for extra storage.
BASKET: Release front and side Velcro® fasteners, then unsnap sides and push side tabs with a small screwdriver to remove basket.
09. BUCKLE
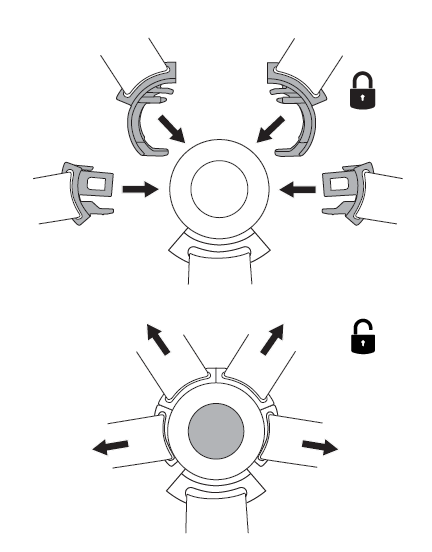
Attach shoulder straps to the center buckle, then attach waist straps.
To release, press center button and pull out straps.
10. ADJUST SHOULDER AND WAIST HARNESS
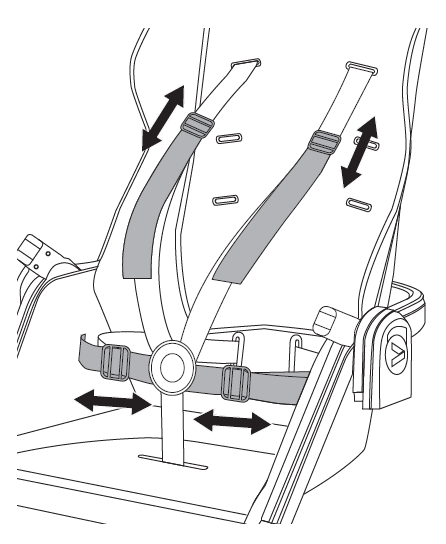
Slide shoulder strap covers off to reveal harness, then adjust to fit comfortably.
Adjust waist straps to fit comfortably.
11. ADD SWITCHBACK SEAT
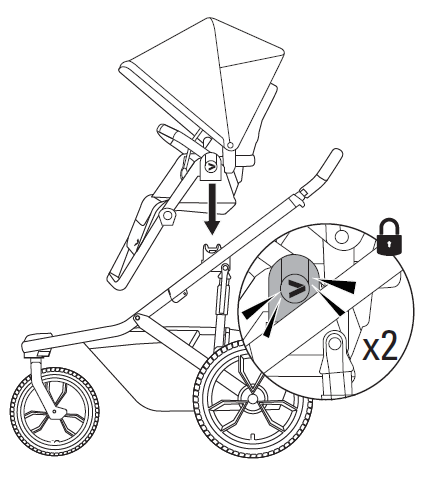
Lower seat into seat hubs until it clicks into place. Pull up on arm bar to confirm secure connection.
12. RECLINE SEAT
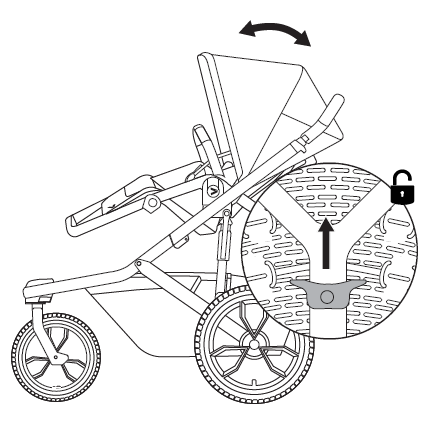
Squeeze and slide trigger on seat back to adjust to one of four positions. Release to lock in place.
13. REMOVE OR REVERSE SEAT
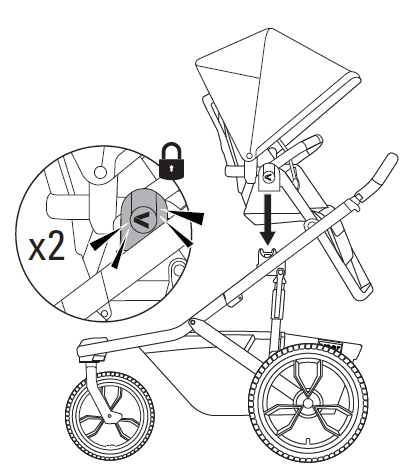
Press seat hub buttons to release, then lift to remove. To face the opposite way, reverse and lower seat into jogger until it clicks into place. Pull up on arm bar to confirm secure connection.
14. SAFETY STRAP AND ADJUST CALF SUPPORT
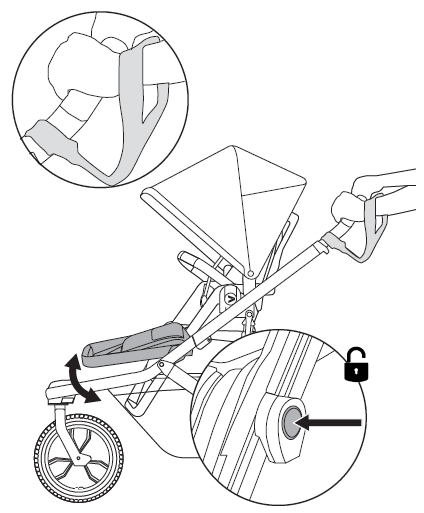
SAFETY STRAP: Slide strap over wrist.
Press calf support adjustment buttons to move calf support to desired position. Release buttons to lock in place.
15. FOLD FOR STORAGE
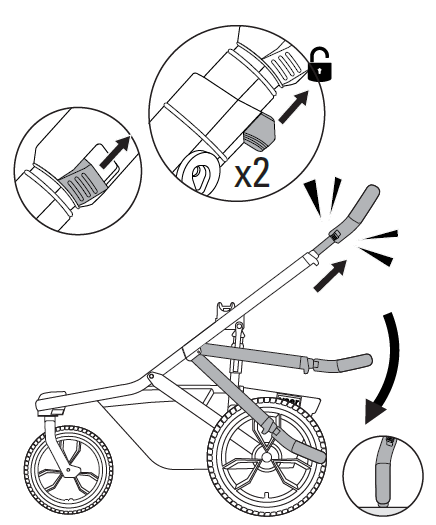
WITHOUT SEAT: Extend handle to the highest position. Pull fold actuators and swing handle down until it clicks into place. Two small bumpers provide extra stability.
16. FOLD FOR STORAGE
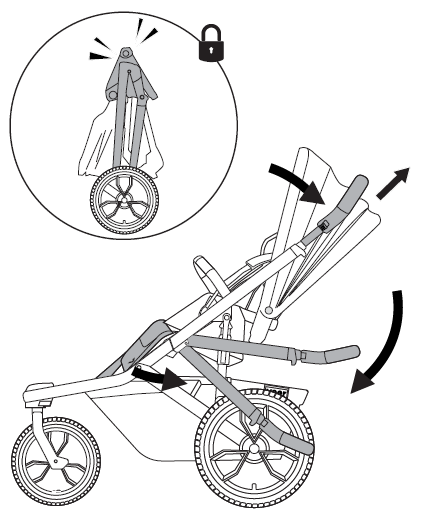
WITH SEAT: Push Seat back until it aligns with handle and calf support until it aligns with back legs. Extend handle to highest position, then pull fold actuators and swing handle down until it clicks into place.
P/N: D02012304