&Bike Bicycle AdapterUpdated 3 months ago
First 10 minutes
New to the &Bike Bicycle Adapter? Here's the fastest path from unboxing to your first ride.
Switchback Seat installation is covered below.
Safety warnings
+−
Never leave children unattended. Failure to follow these warnings and instructions could result in serious injury or death.
For use with Switchback Seat only.
Before you ride
- This carrier is designed to be attached to the rear of the bicycle, behind the bicycle seat.
- The bicycle must be in good working order, of a type appropriate for the additional load, and of proper size and adjustment for the rider. Make sure your bicycle is compatible with this child seat. If you have any questions, check the information supplied with the bicycle, or ask the bicycle dealer or manufacturer.
- Tighten fasteners securely, and check them frequently.
- Do not carry a child who is too young to sit comfortably and independently in the carrier. A pediatrician should be consulted before any child younger than one year is carried.
- Ensure initially, and check from time to time, that the child's weight does not exceed the load limit of the carrier.
- Additional luggage or accessories should not be attached to the carrier, as they may exceed the load limit and may lessen stability. Total load limit for the carrier is 40 lbs. (18 kg).
- Make no modifications to the carrier.
- Do not allow any of the child's body, clothing, shoe laces, or toys to come in contact with moving parts of the bicycle.
- Always attach the retention system snugly around the child.
- When no child is being carried, fasten the retention system buckles so the straps do not hang loosely.
- Ensure the rider and child are wearing approved bicycle helmets.
- Never ride in inclement or hazardous conditions.
During every ride
- The load of a child carrier may lessen the stability and alter the riding characteristics of the bicycle, particularly regarding steering and braking.
- Never leave the child unattended in the carrier.
- Never leave the child in a carrier with the bicycle supported only by a kickstand.
- A rear reflector that complies with CPSC regulations must be visible whether the carrier is on the bicycle or not.
- Before each ride, ensure the mounted carrier does not interfere with braking, pedaling, or steering of the bicycle.
- Never ride the bicycle at night without adequate lighting.
- Always use straps on foot cups to keep feet and legs in place.
- Always use with Switchback Seat facing forward.
- Discontinue use of canopy if subject to cross-winds or if the bike begins to feel unstable.
- Discontinue use of armbar if proper bike seat-to-rider fitment is not achieved.
Transport & storage
- Always remove the carrier from the bicycle when the bicycle is being transported on a motor vehicle. The force of high wind on the carrier may degrade or damage it to the point that it will not perform reliably.
- Presence of a child carrier on a bicycle may require alteration of the method used by the rider to mount or dismount the bicycle. Always ensure that mounting bayonets are locked in place.
- Always ensure that Switchback Seat hubs are locked in place on bike adapter posts.
Failure to comply with the manufacturer's instructions can lead to serious injury or death of the passenger/rider.
Compatibility
+−
The &Bike Bicycle Adapter is designed for bikes with threaded seat stay bosses and rear dropout bosses.
If your bike doesn't have threaded rear dropout bosses, use the &Bike quick release part provided.
If your bike doesn't have threaded seat stay bosses, purchase a seat post clamp with threaded bosses, available online or at your local bike shop.
If your bike doesn't have threaded rear dropout bosses, you must purchase the &Bike Quick Release Mounting Kit.
To install the bike adapter on a Mahle rear-hub-driven e-bike, you must purchase the &Bike E-Bike Rear Hub Motor Mounting Kit.
Please visit goveer.com for more information.
Bike rack assembly
+−
Follow these steps to assemble and mount the bike rack on your bicycle. Do not fully tighten any fasteners until instructed.
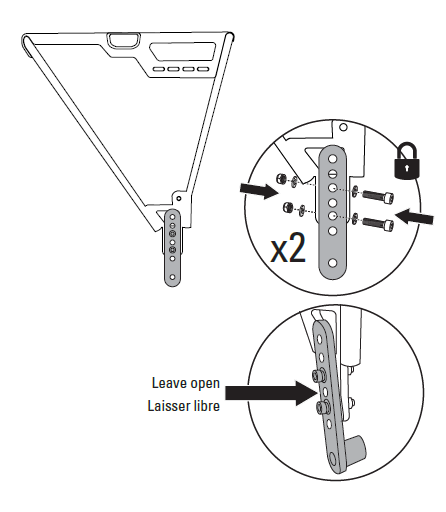
Assemble bike rack
Attach dropouts to the bike rack using the long bolts, washers, and nuts from hardware bag 1. There are multiple holes in the dropout to permit height adjustment of the rack on your bicycle.
We recommend starting with the rack height set in the middle position as shown in the image.
Note: See the "Alternate Assembly with Quick Release Skewer" section below if your bike doesn't have threaded bosses.
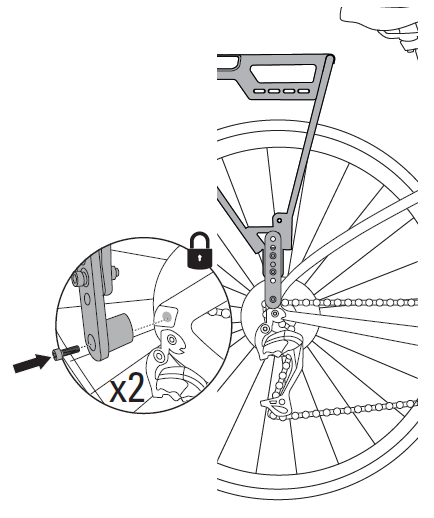
Temporarily secure to threaded dropout bosses
Bolt the rack to the threaded dropout bosses using the short bolts from hardware bag 1.
Do not fully tighten at this time.
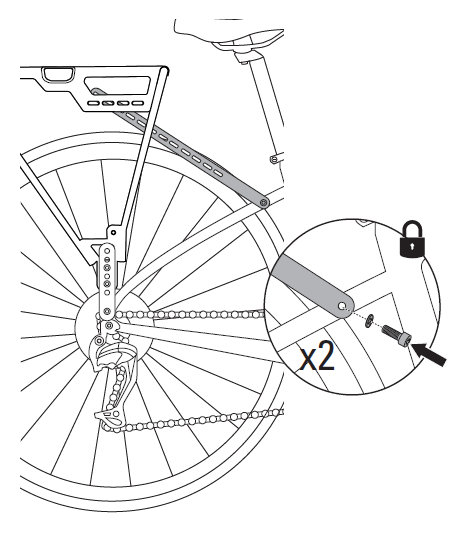
Temporarily attach front mounting arms
With mounting arms inside the bike rack's frame, attach the end of each mounting arm to the bicycle's threaded seat stay bosses using one bolt and washer from hardware bag 2 for each arm.
Do not fully tighten at this time.
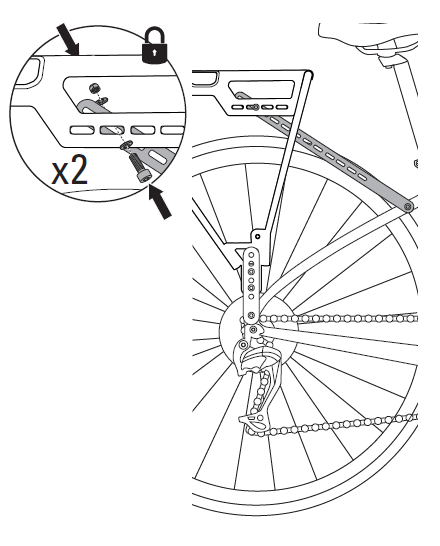
Attach front mounting arms
Ensure the bike rack is level, then secure each mounting arm to the inside of the rack's frame using the remaining hardware from hardware bag 2. You may need to bend or twist the mounting arms.
Do not fully tighten at this time.
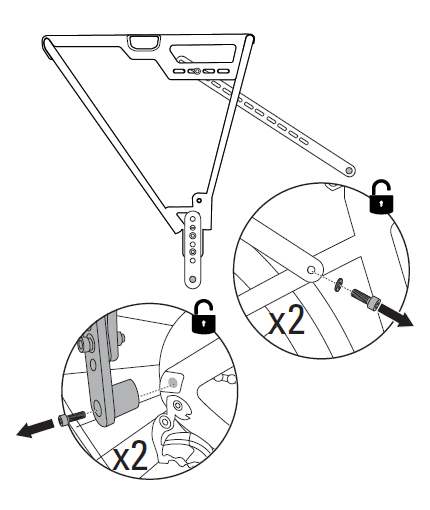
Remove bike rack
Remove the rack from your bicycle and place all hardware in a safe place.
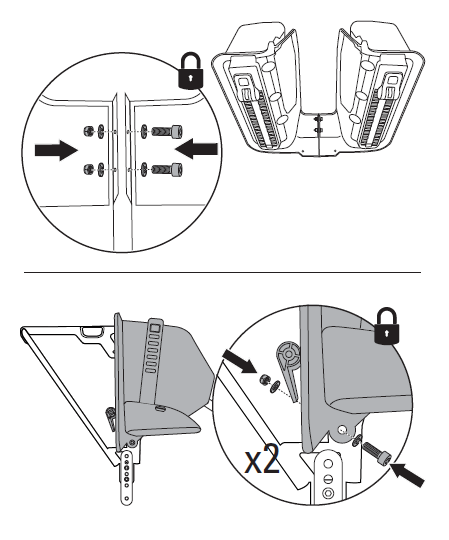
Assemble & attach leg guards
Bolt leg guards together using hardware from bag 3 and tighten to a torque of 3.0 N-m (26.6 in-lb).
Mount leg guards to rack using the long bolts, washers, and nuts from hardware bag 4 and tighten to a torque of 5 N-m (44 in-lb).
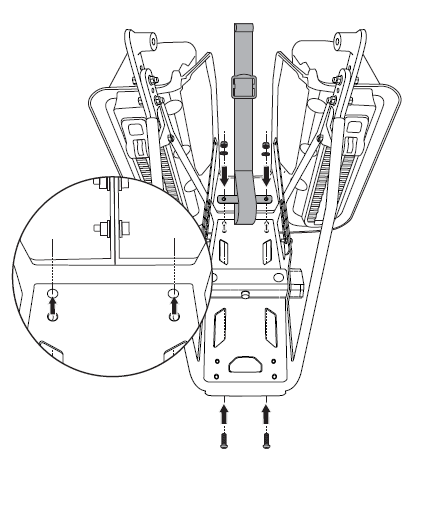
Attach safety strap
Using the remaining hardware from bag 4, insert bolts through the top of the leg guards. Place the safety strap anchor through the loop of the safety strap and slide the anchor onto the bolts.
Add the washers and nuts and tighten to a torque of 5 N-m (44 in-lb).
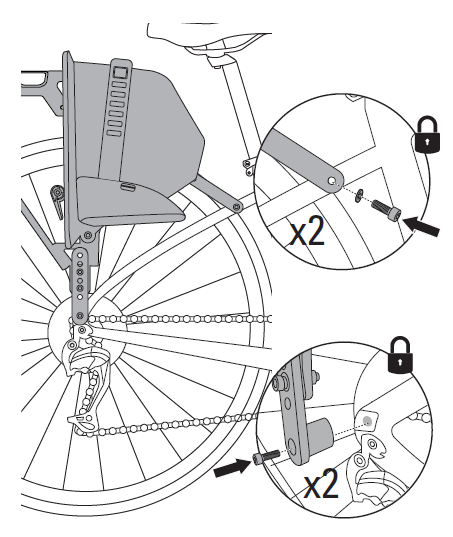
Reattach rack to bicycle
Reattach the rack to your bicycle using the hardware you set aside and tighten to a torque of 3 N-m (26 in-lb).
✓ Pull the rack firmly to confirm it is secure before every ride.
Alternate assembly with quick release skewer
+−
Use this method if your bike does not have threaded rear dropout bosses. After completing these steps, continue from Step 3 of the Bike Rack Assembly section above.
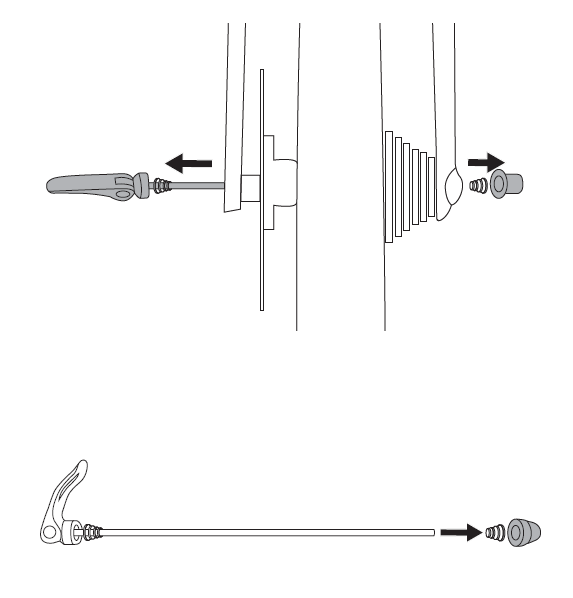
Prepare to install
Stand bike upright with both wheels on the ground, then remove the old quick release skewer.
Remove the nut and one spring from Veer's quick release skewer. Face the narrow end of the remaining spring inward.
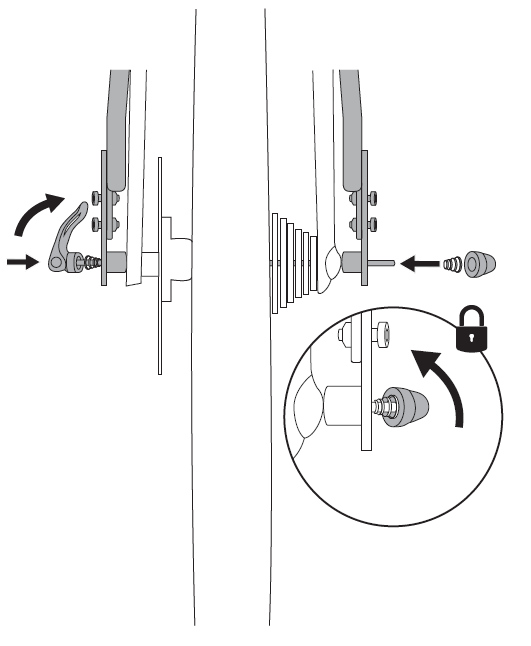
Install quick release lever
Lock the quick release lever, then insert the quick release skewer through the fork dropouts, rack dropouts, and axle.
Slide the spring onto the quick release skewer with the narrow end facing inward, then hand-tighten the nut.
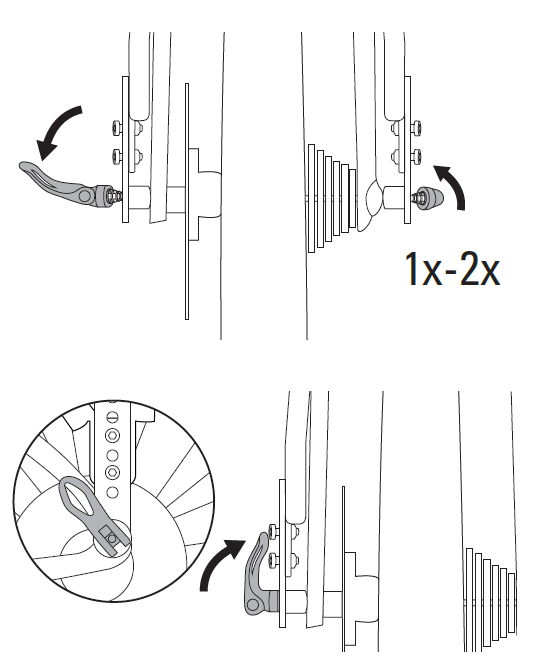
Tighten quick release lever
Unlock the quick release lever, then tighten the nut 1–2 rotations more.
Re-lock the quick release lever. This may take some force, but no tools should be needed.
After this step, continue from Step 3 of the Bike Rack Assembly section above.
Attaching the Switchback Seat
+−
Follow these steps to attach and configure the Switchback Seat on the installed bike rack.
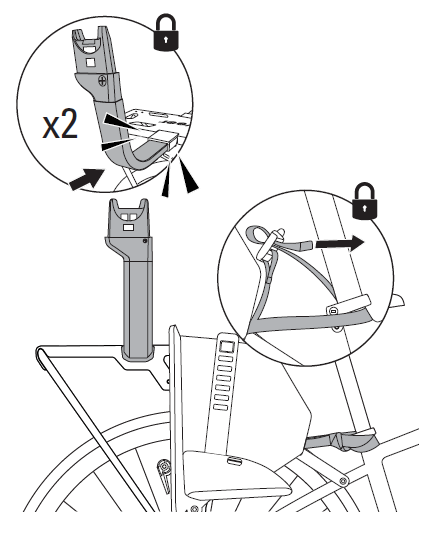
Attach seat post adapters
Wrap the safety strap around the seat tub and tighten. Tie the strap to ensure it doesn't interfere with moving parts.
Push the left and right post adapters into the corresponding left or right receiver on the bike rack. Listen for an audible click.
✓ Pull to confirm secure attachment.
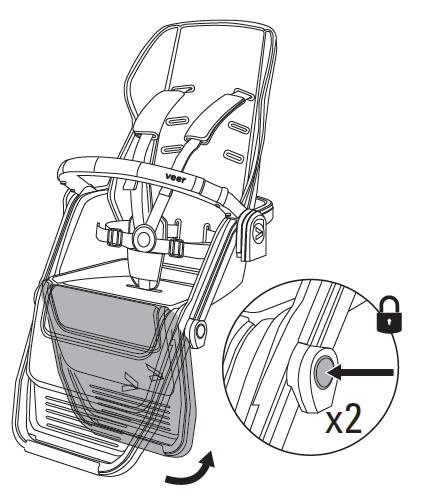
Prepare Switchback Seat
Press the calf support adjustment button to swing the calf support under the bottom of the seat, then release the buttons to lock in place.
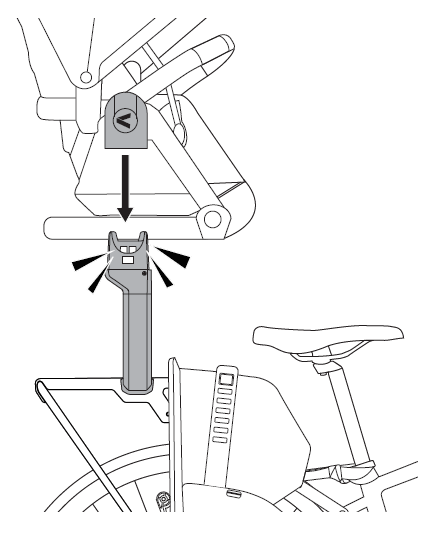
Attach Switchback Seat
Lower the Switchback Seat onto the post adapters until it clicks into place. Listen for an audible click.
✓ Pull up to confirm secure connection.
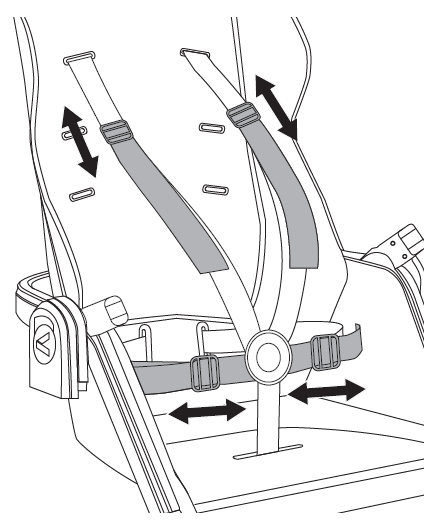
Adjust shoulder-and-waist harness
Slide off the shoulder strap covers to reveal the harness, then adjust to fit comfortably.
Adjust the waist straps to fit comfortably.
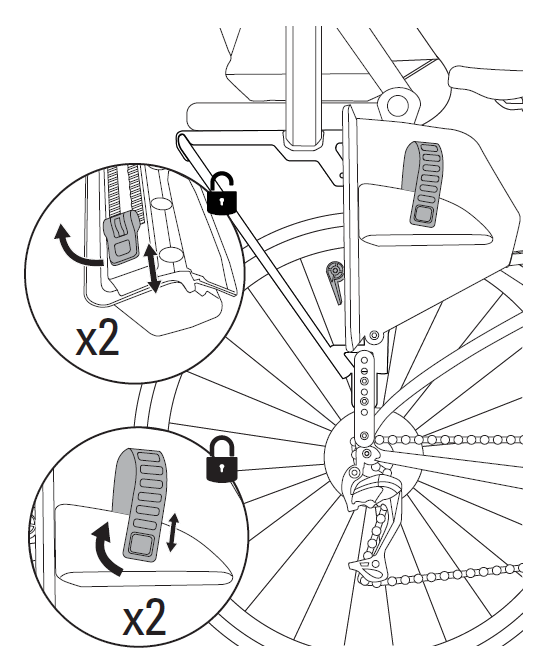
Adjust footrests & foot strap
Lift the back lever to raise or lower the footrests to the desired position, then lock in place.
Pull the strap snugly over the child's foot and lock in place.
✓ Ensure both the bike seat and rack are secure before riding.
Cleaning & general maintenance
+−
Routine cleaning
Wipe with a damp cloth and dry thoroughly. For a more thorough cleaning, rinse with a hose or hand wash with a mild detergent and dry thoroughly.
Do not use abrasives. Do not put in dishwasher.
Limited warranty
+−
We've got you covered
This accessory is guaranteed to be free from any manufacturing defects for a period of 1 year from the date of purchase under normal use and in compliance with the operating instructions.
This warranty is not transferable and extends only to the original retail purchaser and is only valid when supplied with proof of purchase.
Please retain proof of purchase for this limited warranty.
The warranty is valid only in the original country of purchase and is subject to the conditions set out by that country. Conditions may vary. Veer will not ship replacement or repair parts out of the country of purchase.
Veer will provide replacement parts or conduct repairs if deemed appropriate by the company. Veer reserves the right to exchange an item for a replacement part. Some parts may be replaced with newer model parts as the Switchback is improved over time.
What's not covered
A repair issue will not be covered by this warranty if:
- The issue is caused by misuse or improper/poor maintenance.
- Damage is corrosion, mold, or rust caused by a lack of maintenance or service.
- Damage is due to general wear and tear resulting from everyday use or negligence.
- Damage is caused by the intensity of the sun, sweat, detergents, damp storage, or frequent washing.
- Repairs or modifications are carried out by a third party.
- This Switchback accessory is purchased from an unauthorized retailer. Approved retailers are listed at goveer.com.
- This Switchback accessory is second-hand.
- This Switchback accessory is damaged as a result of an accident, airline, or freight damage.
Veer reserves the right to determine whether or not the terms and conditions of the warranty have been met. Please contact Veer should you have any questions regarding your warranty.
For full warranty details, visit goveer.com
Contact & support
Phone: 470-344-3200 · Email: [email protected]